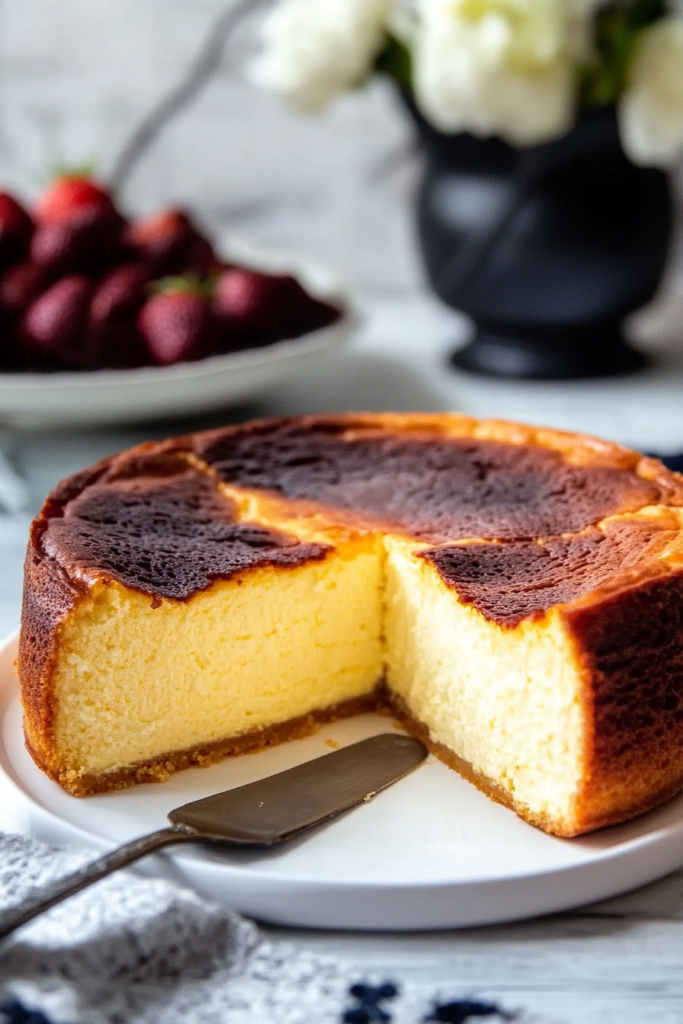
A rich, creamy, and irresistibly caramelized Basque Burnt Cheesecake—without a drop of heavy cream! This decadent dessert features a beautifully burnt top, a creamy interior, and a melt-in-your-mouth texture. Made with simple ingredients like cream cheese, eggs, and a touch of lemon, it’s the perfect balance of sweet, tangy, and indulgent flavors.
This no-fuss cheesecake is easier to make than traditional New York-style cheesecake, with no need for a water bath or crust. Just mix, bake, and let the oven work its magic. The result? A perfectly imperfect cheesecake with a deep golden top, a velvety center, and an airy yet creamy bite. It’s elegant enough for special occasions and simple enough for a weekend treat!
About The Recipe
I’ve always loved cheesecake, but I never enjoyed the hassle of making it. Between the water bath, long bake times, and potential for cracks, traditional cheesecakes can be intimidating. That’s why Basque Burnt Cheesecake is a dream come true!
This recipe was born out of my desire to create a luxuriously creamy cheesecake without heavy cream—and trust me, you won’t even miss it. By using high-quality cream cheese and a bit of cornstarch, this cheesecake achieves the perfect texture: rich but light, creamy yet firm. The slight hint of lemon adds freshness, while the burnt top brings a delightful caramelized depth.
No fancy techniques, no complicated steps—just a foolproof cheesecake that’s meant to look rustic and taste divine. It’s the kind of dessert that impresses with minimal effort. Whether you’re a seasoned baker or a beginner, this Basque Burnt Cheesecake is a must-try.
Why You Will Love This Basque Burnt Cheesecake
- No heavy cream required – Still incredibly creamy and rich!
- No water bath needed – Just mix, bake, and let it brown beautifully.
- Perfectly imperfect – A burnt top is exactly what you want.
- Only a handful of ingredients – Simple pantry staples create magic.
- Velvety texture – Light, airy, and melts in your mouth.
Equipment Needed
Before diving into the baking process, it’s important to have the right tools on hand. Fortunately, this Basque Burnt Cheesecake doesn’t require any fancy equipment—just a few basics that you probably already have in your kitchen.
Essential Tools:
- Mixing Bowl – To combine all the ingredients smoothly.
- Whisk – For mixing the batter to the perfect consistency.
- Cake Mould (8-inch round pan) – This holds the batter and shapes the cheesecake.
- Parchment Paper – Helps prevent sticking and makes it easier to remove the cake.
- Spatula – Ensures every bit of batter is mixed evenly.
- Kitchen Scale – For precise ingredient measurements.
- Fine Mesh Strainer – Helps remove lumps and ensures a smooth batter.
Having these tools ready before you start baking will make the process seamless and stress-free. Since this cheesecake relies on a perfectly smooth batter and a well-lined cake mould, taking a few extra minutes to prepare everything will make all the difference.
Ingredients
This recipe keeps things simple yet indulgent, using only a handful of key ingredients to create that signature Basque Burnt Cheesecake texture and flavor.
What You’ll Need:
- 500g cream cheese (room temperature) – The star of the show, creating that rich and creamy texture.
- 135g granulated sugar – Sweetens the cheesecake without overpowering it.
- 4 large eggs (room temperature) – Provides structure and ensures a smooth texture.
- 14g cornstarch – Helps thicken the batter and replaces heavy cream for a silkier finish.
- 1 tbsp lemon juice (optional) – Adds a touch of brightness and balance.
- Lemon zest (optional) – For an extra hint of citrus freshness.
- Melted butter – Used to grease the mould, ensuring easy removal.
Ingredient Notes:
- Why No Heavy Cream?
Traditional Basque Burnt Cheesecake recipes often use heavy cream, but cornstarch does a fantastic job of creating a similarly silky-smooth consistency without it. - Can I Use Low-Fat Cream Cheese?
It’s best to use full-fat cream cheese for the creamiest texture. Low-fat versions may result in a slightly drier cake. - Is the Lemon Juice Necessary?
While optional, a little acidity enhances the flavor and cuts through the richness.
How to Make the Perfect Basque Burnt Cheesecake
The beauty of Basque Burnt Cheesecake lies in its simplicity—no water bath, no crust, and no fuss! Just mix, bake, and let the oven do its magic. The key to achieving that iconic caramelized top and creamy center is baking at high heat while keeping the batter smooth and well-mixed.
Step 1: Preheat the Oven
Start by preheating your oven to 230°C (450°F). This high temperature is what creates that signature burnt top while keeping the inside soft and creamy.
Step 2: Prepare the Cake Mould
- Melt a small amount of butter and brush it onto your cake mould to prevent sticking.
- Line the mould with parchment paper, making sure it extends past the edges. This helps with easy removal later and adds to the rustic look.
Step 3: Make the Batter
- In a large mixing bowl, add the room-temperature cream cheese and sugar.
- Using a whisk, beat until the mixture is completely smooth and free of lumps. If the cream cheese is too stiff, you can microwave it for 30 seconds to soften.
- Add the cornstarch, lemon juice, and lemon zest (if using). Whisk again until fully combined.
- Crack the eggs one at a time, mixing well after each addition. This ensures a smooth and airy texture without over-mixing.
Step 4: Strain the Batter
For an ultra-smooth cheesecake, pour the batter through a fine-mesh strainer into another bowl. This step removes any small lumps and guarantees a creamy texture.
Step 5: Bake the Cheesecake
- Pour the strained batter into the prepared cake mould.
- Bake in the preheated oven for about 20 minutes. Keep a close eye on the top—it should turn deep golden brown but not blackened.
- The center will still be slightly jiggly, which is exactly what you want!
Step 6: Cooling & Setting
- Once the top is beautifully burnt, remove the cheesecake from the oven and let it cool at room temperature for about 1 hour.
- Then, transfer it to the refrigerator and chill overnight. This helps it set completely and enhances its creamy texture.
Serving & Storage
After chilling overnight, your Basque Burnt Cheesecake is now at its best—ultra-creamy inside with a rich, caramelized top. Here’s how to serve and store it for the best experience.
How to Serve
- Gently remove the cheesecake from the cake mould by lifting the edges of the parchment paper.
- Place it on a serving plate and carefully peel away the parchment paper.
- For clean slices, use a sharp knife and wipe it clean after each cut.
- Let the cheesecake sit at room temperature for 15-20 minutes before serving to soften slightly.
Optional Toppings
While this cheesecake is perfect on its own, you can elevate it with a few simple toppings:
- A dusting of powdered sugar
- A drizzle of honey or caramel
- Fresh berries for a fruity contrast
- A scoop of vanilla ice cream on the side
How to Store
If you have leftovers (which is rare because it’s so good!), follow these storage tips:
- Refrigerate: Store in an airtight container in the fridge for up to 5 days.
- Freeze: Wrap slices individually in plastic wrap and freeze for up to 3 months. Thaw overnight in the fridge before serving.
FAQs & Troubleshooting
Why is my cheesecake not burnt on top?
This usually happens if your oven temperature is too low. Make sure it’s 230°C (450°F) and don’t be afraid to let it brown deeply.
Can I make this cheesecake without cornstarch?
Yes! You can substitute all-purpose flour in the same quantity, though cornstarch gives a smoother texture.
Why is my cheesecake too runny?
The center should be slightly jiggly but not completely liquid. If it’s too runny, it may need a few extra minutes in the oven.
Can I make this cheesecake in advance?
Absolutely! In fact, it tastes better the next day. The flavors develop, and the texture becomes even creamier after chilling overnight.
Final Thoughts
This Basque Burnt Cheesecake is proof that you don’t need heavy cream to create a rich and luxurious dessert. It’s bold, beautiful, and incredibly simple to make. Whether you’re making it for a special occasion or just to satisfy a cheesecake craving, this recipe is fail-proof, crowd-pleasing, and absolutely delicious.
So go ahead—whip up this effortlessly elegant cheesecake, let it burn to perfection, and enjoy every creamy bite!