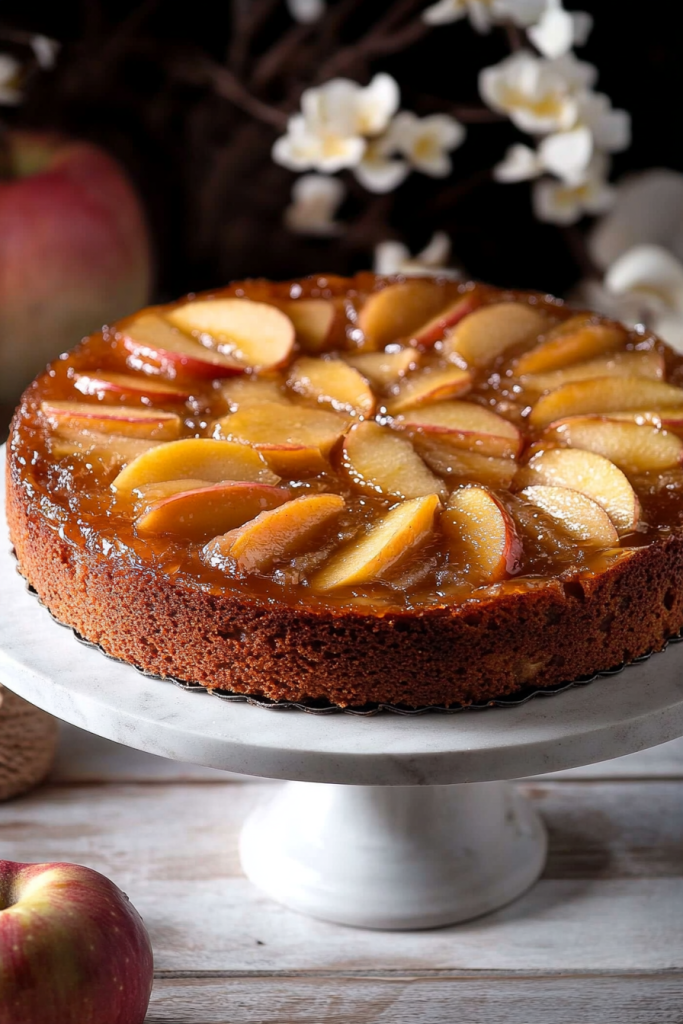
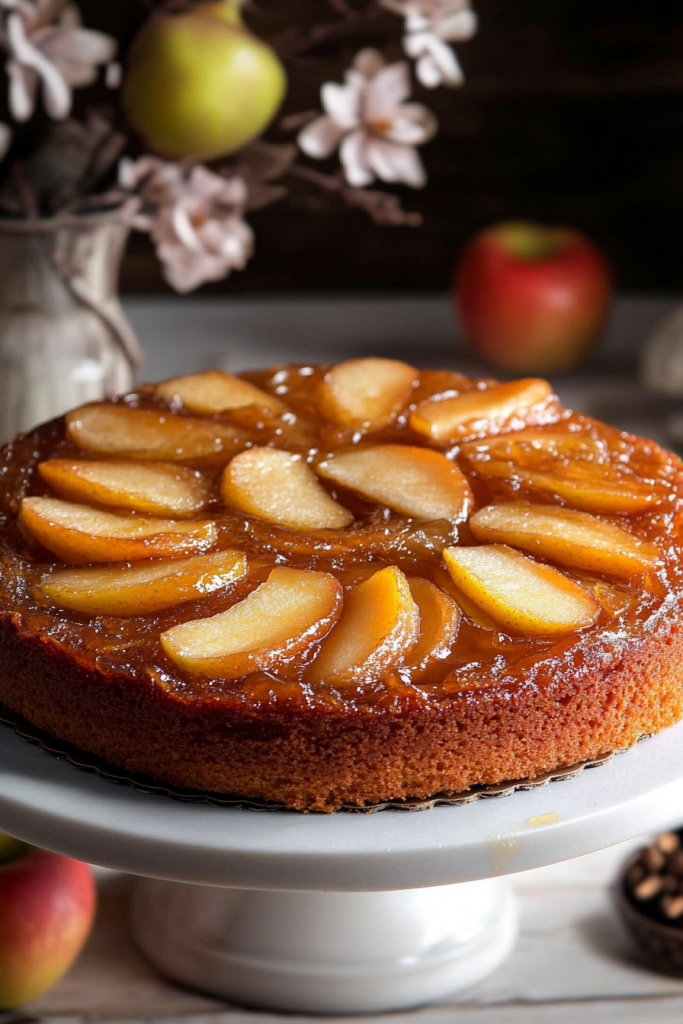
There’s just something about the cozy combination of spiced apples, buttery caramel topping, and soft sponge that makes this Mary Berry Apple Upside Down Cake a year-round favorite. It’s the kind of cake that looks beautifully impressive flipped out of the tin, yet is incredibly easy to make. The apples are gently caramelized in brown sugar and butter, then topped with a light and fluffy sponge. Once inverted, you get that perfect golden topping with tender apples glistening on top. Every bite is warm, soft, sweet, and packed with comforting flavor!
Whether you serve it as a tea-time treat, a simple dessert after Sunday lunch, or even as a holiday showstopper, this cake never fails to impress. It’s the perfect balance of homely and elegant, rustic and refined. And best of all? It’s made with basic ingredients, comes together in one bowl, and is practically foolproof!
About The Recipe
I grew up watching Mary Berry’s shows with my family, and this Apple Upside Down Cake has become a classic in our kitchen ever since. It’s one of those recipes that feels like a warm hug — especially when served slightly warm with a dollop of whipped cream or a scoop of vanilla ice cream.
What I love most about this recipe is how it transforms simple ingredients into something truly special. The apples cook gently in a buttery, sugary base, becoming almost jammy and caramelized, while the sponge is soft and airy with just the right amount of sweetness. No frosting, no fancy tools, no complicated steps — just straightforward baking magic.
This cake is perfect for when you want something seasonal, delicious, and just a bit nostalgic. And yes, it smells absolutely divine while it bakes. Think: warm apples, brown sugar, and vanilla all mingling together in your kitchen.
Reasons You Will Love This Apple Upside Down Cake
- Inspired by a British classic – This recipe channels Mary Berry’s timeless approach to baking: simple, dependable, and downright delicious.
- Beautiful presentation with zero effort – The apples caramelize and create their own glossy topping. Just flip and serve!
- Minimal equipment and ingredients – No mixers or complicated techniques needed. Everything comes together quickly and easily.
- Warm, buttery, and comforting – The combination of caramelized apples and tender sponge is utterly cozy.
- Perfect for any occasion – Whether it’s a weekend bake, holiday dessert, or family dinner treat, this cake fits right in.
- Versatile and customizable – Use your favorite apples (tart or sweet!) and spice it up with a pinch of cinnamon or nutmeg if you like.
Equipment Needed
Here’s everything I use when baking this easy upside-down cake:
- 9-inch round cake pan (preferably non-stick)
- Mixing bowls
- Hand whisk or electric mixer
- Rubber spatula
- Small saucepan or microwave-safe bowl (for melting butter)
- Knife and peeler (for the apples)
- Cooling rack
- Offset spatula or butter knife (to loosen the edges before inverting)
Ingredients
For The Topping:
- 4 tbsp Unsalted Butter (melted) – Creates a rich, glossy base that blends with the sugar to caramelize the apples.
- ½ cup Brown Sugar – Adds depth and caramel flavor to the topping.
- 2 Large Apples (peeled, cored, and thinly sliced) – I love using Granny Smith for a tart contrast, but Honeycrisp or Pink Lady also work beautifully.
For The Cake Batter:
- ½ cup Unsalted Butter (softened) – Gives the cake a moist, rich crumb.
- ¾ cup Caster Sugar – A finer sugar that dissolves easily and gives a delicate texture.
- 2 Large Eggs – Provide structure and help the cake rise.
- 1 tsp Vanilla Extract – Adds warmth and flavor.
- 1 cup Self-Raising Flour – Simplifies the recipe by including the leavening agents.
- ¼ cup Whole Milk – Keeps the batter soft, smooth, and easy to spread.
How To Make Mary Berry’s Apple Upside Down Cake
Step 1: Prepare the Topping
Start by preheating your oven to 180°C (350°F). This gives the cake just the right heat to bake evenly and develop a beautiful golden color.
Next, pour your melted butter into the base of a 9-inch round cake pan, gently swirling it around to coat the bottom. Sprinkle the brown sugar evenly over the butter. This forms the base that will caramelize as the cake bakes.
Now, arrange your apple slices in a circular pattern over the sugar-butter layer. I like to overlap the slices slightly in a spiral for that beautiful floral effect once the cake is inverted — but honestly, it doesn’t have to be perfect. Rustic looks just as delicious!
Step 2: Make the Cake Batter
In a large mixing bowl, cream together the softened butter and caster sugar. I usually use a hand mixer here, but a whisk works fine if you don’t mind a little extra elbow grease. You’ll want the mixture to be pale, light, and fluffy — this usually takes about 2–3 minutes.
Then, beat in the eggs one at a time, mixing well after each addition. Stir in the vanilla extract, which adds that comforting warmth to the sponge.
Step 3: Combine Dry Ingredients
Now, sift in the self-raising flour. This step not only ensures the flour is lump-free but also helps create a lighter sponge. Gently fold it into the wet mixture using a spatula or wooden spoon until just combined.
Finally, pour in the milk and give the batter a few gentle stirs — just until it’s smooth and well blended. Be careful not to overmix at this stage; overworking the batter can make the cake dense.
Step 4: Assemble and Bake
Carefully spoon the cake batter over the arranged apples in your pan. Use a spatula to spread the batter evenly, covering the apples completely. It’s okay if it seems like a thin layer — it rises beautifully in the oven.
Pop the pan into your preheated oven and bake for 30–35 minutes, or until a toothpick inserted into the center comes out clean. The top should be golden brown, and the edges will begin to pull away from the sides of the pan.
Cooling, Serving & FAQs
Step 5: Cool and Invert
Once the cake is done, remove it from the oven and let it cool in the pan for 10 minutes. This rest time allows the topping to settle slightly without sticking to the pan.
Then, run a butter knife or offset spatula gently around the edges to loosen the cake. Carefully invert it onto a serving plate — and voilà! That gorgeous layer of caramelized apples is now sitting proudly on top, shiny and golden. It’s a little moment of baking magic every single time.
Let it cool slightly before slicing. You can serve it warm or at room temperature, depending on your mood — but trust me, a warm slice with a scoop of vanilla ice cream or a dollop of whipped cream is simply heavenly.
FAQs and Troubleshooting
Can I make this cake in advance?
Absolutely! You can bake the cake a day ahead, keep it covered at room temperature, and warm it slightly before serving. It also reheats well in the microwave for a few seconds.
What apples work best?
I love tart apples like Granny Smith because they contrast so well with the sweetness of the topping. But Honeycrisp, Pink Lady, or even Braeburn work great too. Just make sure they’re firm enough to hold their shape while baking.
My apples stuck to the pan — help!
Make sure to coat the base of the pan well with butter and sugar, and don’t skip the 10-minute cooling time. If a few apple slices stay behind, don’t panic! Gently lift them out and reposition them on top — no one will ever know.
Can I add spices?
Yes! For a warmer, spiced twist, add ½ teaspoon of ground cinnamon or a pinch of nutmeg to the cake batter or even sprinkle a bit over the apples before baking.
How should I store leftovers?
Keep any leftover cake covered at room temperature for up to 2 days, or refrigerate it for up to 5 days. It can also be wrapped and frozen for up to 2 months. Just thaw and gently reheat before serving.
Decorating & Serving Ideas
This cake is already a showstopper on its own, but here are a few ideas to elevate it:
- Dust with powdered sugar just before serving.
- Drizzle with a touch of warm caramel sauce for an extra indulgent finish.
- Serve with creme fraiche or Greek yogurt if you prefer a tangy contrast.
- Top with a scoop of vanilla or cinnamon ice cream for dessert perfection.
Final Thoughts
This Mary Berry Apple Upside Down Cake is one of those bakes that feels both nostalgic and elegant — the kind of cake that turns a simple afternoon into something special. It’s buttery, warm, soft, and just the right amount of sweet, with that irresistible apple topping that makes it unforgettable.
Whether you’re baking for family, guests, or just because you love cake (same), this recipe never disappoints.