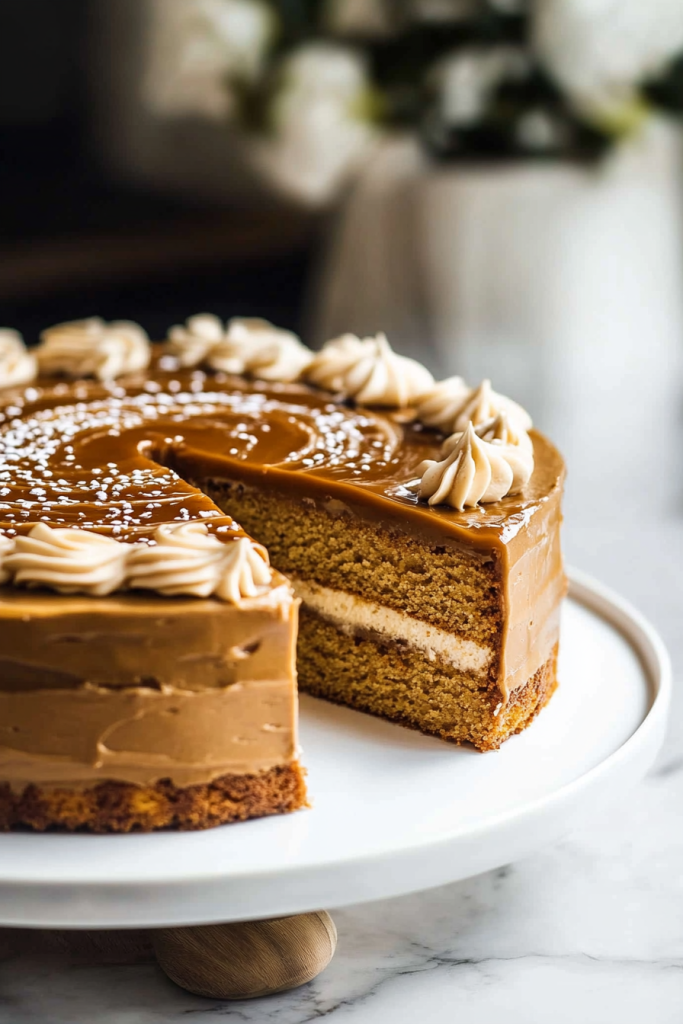
If you’re looking for a show-stopping dessert to wow your guests, the Dulce de Leche Cake is your go-to choice! It’s a perfectly moist, decadent cake that brings together the irresistible flavors of caramelized milk and sweet buttercream. With rich layers of cake and the luscious flavor of dulce de leche, every bite is an indulgence. Whether you’re celebrating a special occasion or just craving something extraordinary, this cake will satisfy all your sweet tooth cravings.
About The Recipe
The Dulce de Leche Cake was born out of my love for rich, creamy desserts that combine the best flavors of caramel and vanilla. I’ve always been fascinated by dulce de leche – a smooth, golden syrup made from caramelized milk – and how it can elevate the simplest of cakes into something truly decadent.
What makes this cake special is not only the addition of dulce de leche in the cake batter and frosting but also how easy it is to make. The cake itself is wonderfully soft and moist, while the buttercream frosting has a smooth, sweet finish. The result is a cake that is beautifully layered, with that perfect balance of sweetness and a hint of richness from the dulce de leche.
This recipe takes a classic cake to new heights, making it perfect for everything from birthdays and holidays to casual weekend baking. It’s guaranteed to impress anyone who tries it!
Reasons You’ll Love This Dulce de Leche Cake
- Incredibly moist cake: The cake is so tender and moist thanks to the addition of sour cream and milk.
- Lusciously rich frosting: The buttercream frosting is infused with dulce de leche, making it incredibly creamy and smooth.
- Easy to make: While it looks impressive, this cake is surprisingly easy to make and assemble.
- Versatile: Perfect for a celebration or just a simple dessert at home.
- A crowd-pleaser: The rich caramelized flavor of dulce de leche will have everyone asking for seconds.
Equipment Needed
- 2 8-inch round cake pans
- Electric hand mixer or stand mixer
- Spatula
- Piping bags (optional)
- Parchment paper rounds (for easy cake removal)
- Cooling racks
Ingredients
For the Cake:
- 2/3 cup unsalted butter (151g), room temperature
- 1 cup granulated sugar (200g)
- 3 large eggs, room temperature
- 1 teaspoon vanilla extract
- 2 cups all-purpose flour (250g)
- 2 teaspoons baking powder
- 2/3 teaspoon salt
- 3/4 cup whole milk (187g), at room temperature
- 1/2 can (7 oz) dulce de leche*
- 2 tablespoons sour cream
Description:
- Unsalted Butter: Used to add richness to the cake.
- Granulated Sugar: Sweetens the cake without being overwhelming.
- Eggs: Essential for structure and moisture.
- Dulce de Leche: The star of the cake – adds depth and flavor, both in the batter and in the frosting.
- Sour Cream: Keeps the cake moist and adds a bit of tanginess that balances out the sweetness.
For the Dulce de Leche Buttercream:
- 1 1/2 cups unsalted butter (340g), slightly cold
- 4 cups powdered sugar (480g), sifted
- 1/2 can (7 oz) dulce de leche*
- Flake salt, optional for garnish
Description:
- Butter: Creates a creamy base for the frosting.
- Powdered Sugar: Adds sweetness and texture to the frosting.
- Dulce de Leche: Again, the key flavor, giving the frosting a rich caramel taste.
- Flake Salt: A pinch on top adds a touch of contrast to the sweet cake and frosting.
ChatGPT said:
How to Make the Perfect Dulce de Leche Cake
Now that we’ve gathered our ingredients and equipment, it’s time to start baking! This cake is a combination of rich, soft layers with the deep, sweet flavor of dulce de leche that makes it a standout dessert. Follow these easy steps, and you’ll have a decadent cake ready to impress.
Step 1: Preparing the Cake Layers
- Preheat your oven to 350°F (175°C). Grease and line the bottom of two 8-inch cake pans with parchment paper rounds. This will help the cakes release easily after baking.
- Cream the butter and sugar: In a large mixing bowl (or the bowl of a stand mixer), cream together the butter and granulated sugar for about 3 minutes, until the mixture is light and fluffy. The butter should be soft but not melted, which will help create a smooth batter.
- Add the eggs and vanilla: Beat in the eggs, one at a time, making sure to fully incorporate each one before adding the next. Stir in the vanilla extract.
- Incorporate the sour cream and dulce de leche: Add the sour cream and half of the dulce de leche (about 7 ounces), mixing until the batter becomes lighter in color and fluffy.
- Mix the dry ingredients: In a separate bowl, whisk together the flour, baking powder, and salt. With the mixer on low speed, gradually add the dry ingredients to the wet mixture, alternating with the whole milk. Start and end with the dry ingredients. Mix until just combined.
- Bake the cake layers: Divide the batter evenly between the two prepared cake pans. Smooth the tops with a spatula. Bake in the preheated oven for 23-25 minutes, or until a toothpick inserted into the center comes out clean or with just a few moist crumbs. Be sure not to over-bake, or the cake could dry out.
- Cool the cakes: Once baked, let the cakes cool in the pans for about 10 minutes. Then, remove them from the pans and transfer them to a wire rack to cool completely.
Step 2: Making the Dulce de Leche Buttercream
- Cream the butter: In the bowl of a stand mixer, beat the slightly cold butter on medium-high speed until creamy and smooth, about 2 minutes.
- Add the powdered sugar: Gradually add the sifted powdered sugar, 1/2 cup at a time, beating on low speed to avoid a sugar cloud. Once all the sugar is incorporated, increase the speed to medium and beat until fluffy.
- Add the dulce de leche: Mix in the dulce de leche until fully combined. If the frosting is too thick, you can add a tablespoon or two of milk to adjust the consistency to your liking.
- Finish the frosting: Continue to beat the frosting for another 2-3 minutes until it’s light and fluffy.
Assembling the Dulce de Leche Cake
Now comes the fun part – assembling and decorating the cake! This is where the magic happens, and your beautiful cake comes to life with layers of creamy dulce de leche and smooth buttercream.
- Prepare the cake layers: Once the cakes have completely cooled, place the first cake layer on a cake plate or a serving platter. This will be the bottom layer of your cake.
- Add the frosting: Spread a thin layer of the dulce de leche buttercream over the top of the first cake layer. This will act as the “crumb coat,” helping the layers stick together and keeping the cake’s appearance neat.
- Add the dulce de leche: Take half of the remaining dulce de leche and microwave it for a few seconds to soften. Then, spread it over the top of the buttercream layer, leaving about an inch of space around the edge.
- Stack the second layer: Place the second cake layer on top of the first, pressing it down gently to make sure the layers stick together. If the layers aren’t perfectly even, use a serrated knife to trim the top of the cake until it’s flat.
- Apply a crumb coat: Apply a thin layer of frosting around the sides and top of the cake. This helps to seal in any crumbs. Refrigerate the cake for about 20 minutes to set the crumb coat.
Final Frosting and Decoration
Once the crumb coat has set, it’s time to finish decorating your Dulce de Leche Cake to perfection!
- Frost the cake: After chilling the crumb coat, apply a generous layer of the remaining dulce de leche buttercream over the top and sides of the cake. Use a small offset spatula to smooth out the frosting, making sure it’s evenly spread.
- Top with more dulce de leche: Microwave the remaining half can of dulce de leche for a few seconds to soften it, and then drizzle it over the top of the cake, leaving a 1-inch border. You can also spread it out more evenly with a spatula for a smooth finish.
- Piping for decoration: If you like a bit of decorative flair, use a piping bag fitted with your choice of tip, like a Wilton 1M or Wilton 2D, to pipe beautiful swirls around the top edge of the cake. This adds a lovely touch of elegance to your finished creation.
- Finishing touches: For an extra touch, sprinkle a pinch of flaky sea salt on top of the cake. This adds a perfect balance of sweet and salty flavors, enhancing the rich taste of the dulce de leche.
- Chill the cake: Place the cake in the refrigerator until you’re ready to serve. This helps the frosting set properly and ensures that the cake holds its shape when you slice it.
Serving and Storing Your Dulce de Leche Cake
Now that your Dulce de Leche Cake is beautifully assembled, it’s time to enjoy the fruits of your labor!
- Serving: When ready to serve, cut the cake into slices and enjoy the rich layers of cake and creamy frosting. This cake pairs wonderfully with a cup of coffee or a sweet dessert wine.
- Storing: If you have leftovers (though I doubt you will!), store the cake in an airtight container in the refrigerator for up to a week. The frosting may become slightly firmer when chilled, but the flavors will still be just as delicious. You can also freeze the cake for up to a month. Just be sure to wrap it well in plastic wrap before storing.
I hope you enjoy making and serving this incredibly rich and decadent Dulce de Leche Cake.