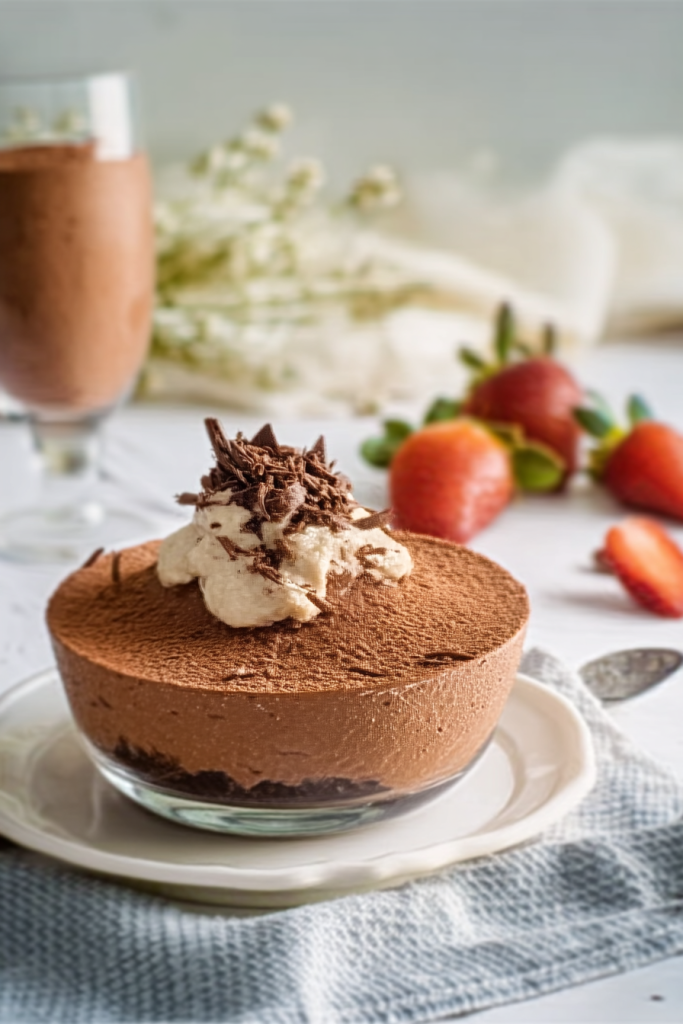
There’s something truly magical about a perfectly executed chocolate mousse, but when you infuse it with the rich, creamy notes of Baileys Irish Cream? That’s when dessert transcends into something extraordinary! My Baileys Chocolate Mousse recipe combines silky milk chocolate with the distinctive flavor of Irish cream liqueur to create what I consider the ultimate grown-up dessert.
I’ve been perfecting this recipe for years, and it never fails to impress guests at dinner parties or provide that perfect indulgent treat for a cozy night in. What I love most about this Baileys Mousse is how it balances sophisticated flavors with surprising simplicity. The velvety texture literally melts in your mouth, leaving behind the perfect harmony of chocolate and Irish cream.
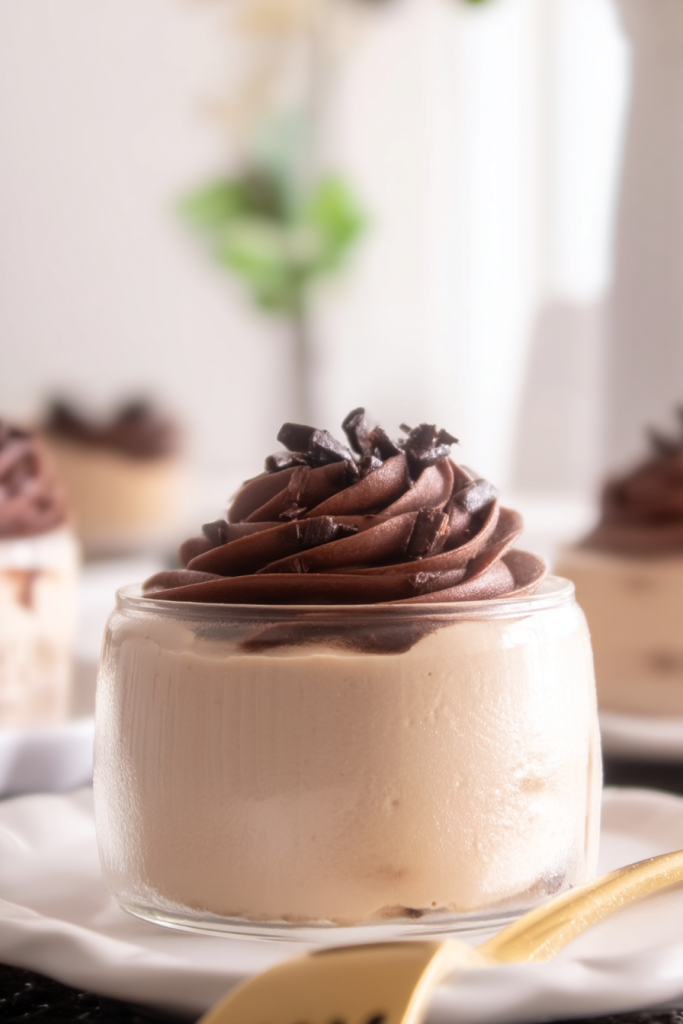
While it looks and tastes like something from a high-end restaurant, this decadent dessert requires just a handful of quality ingredients and some patience while it chills. The elegant presentation with decorative chocolate ganache makes it a showstopper for special occasions, but it’s easy enough to whip up whenever you’re craving something truly special.
Each spoonful delivers that perfect balance of rich chocolate and the distinctive caramel, vanilla, and whiskey notes from the Baileys. It’s the dessert I turn to when I want to transform an ordinary evening into something memorable, or when I need a guaranteed crowd-pleaser for gatherings with friends and family.
Ready to create this sublime dessert that will have everyone asking for your secret? Let’s dive into how to make this irresistible Baileys Chocolate Mousse!
Ingredients for Baileys Chocolate Mousse
For the Mousse:
When I’m making this decadent dessert, I always focus on quality ingredients—they truly make all the difference in achieving that perfect silky texture and rich flavor.
- 300g milk chocolate – I highly recommend using a good quality block of chocolate rather than baking chips. The higher cocoa butter content in premium chocolate bars creates a much smoother, more luxurious mousse. I find that chocolate with around 35-40% cocoa solids offers the perfect balance of sweetness and depth.
- 375ml whipping cream – This is the foundation of our mousse’s dreamy texture. In my kitchen, I use what we call standard or whipping cream, which contains about 35% fat. Depending on where you live, you might know it as full cream, heavy cream, or heavy whipping cream. The key is choosing a pourable, unwhipped cream with approximately 35% fat content that’s specifically labeled as suitable for whipping.
- 125ml Baileys Irish Cream – The star ingredient that transforms this from an ordinary chocolate mousse into something extraordinary. The distinct flavor profile of Baileys—with its notes of Irish whiskey, cream, coffee, and vanilla—adds incredible depth and a sophisticated edge to this dessert. I wouldn’t substitute it with other liqueurs if you want that authentic taste.
For the Decorative Ganache:
This optional but impressive element elevates the presentation to restaurant quality:
- 90g milk chocolate – Again, quality matters. I use the same premium chocolate as in the mousse for consistency in flavor.
- 30g whipping cream – Just enough to create a pipeable ganache for decorating.
- 1 teaspoon Baileys Irish Cream – This small addition ensures the decoration echoes the flavor in the mousse itself.
What I love about this recipe is its simplicity—just six ingredients total, and most are repeated between the mousse and ganache. The magic happens in how they come together, which we’ll explore in the next sections.
Preparation Techniques
Before diving into the actual cooking process, I’ve found that proper preparation makes all the difference when creating this indulgent Baileys Mousse. Let me walk you through some essential techniques and tips I’ve learned over years of making this dessert.
Chocolate Selection and Handling
When working with chocolate, proper melting is crucial. I always chop my chocolate into small, uniform pieces before melting. This ensures even heat distribution and prevents scorching. The finer you chop it, the more quickly and evenly it will melt when the hot cream is poured over it.
I’ve discovered through trial and error that chocolate chips are a definite no-go for this recipe. They contain stabilizers that prevent them from melting properly, which can ruin the smooth texture we’re aiming for. Always opt for chocolate bars or blocks specifically designed for baking or cooking.
Temperature Control
Temperature is absolutely critical when making mousse. I make sure all my equipment—bowls, whisks, and measuring tools—are at room temperature before starting. Cold utensils can cause the chocolate to seize or the cream to cool too quickly.
For the initial chocolate melting, I never apply direct heat. The gentle melting method where hot cream is poured over chopped chocolate (creating what’s called a ganache base) prevents overheating and maintains the chocolate’s smooth properties.
Chilling Strategy
Perhaps the most underestimated aspect of mousse-making is the chilling process. I’ve learned that patience truly pays off here. While the recipe requires “at least several hours” of chilling, I find overnight refrigeration creates the perfect flavor development as the Baileys has time to fully integrate with the chocolate and cream.
If you’re in a hurry (as I sometimes am), the freezer method works, but requires vigilance—stir every 15-20 minutes and never let it actually freeze, as this will destroy the texture.
Preparing Your Serving Vessels
I always prepare my serving glasses or bowls before whipping the final mousse. This thoughtful preparation accomplishes two things: it allows time for any decorative elements to set properly, and it means you can transfer the freshly whipped mousse immediately, before it begins to set in the bowl.
Clear glasses are my preference as they showcase the elegant ganache decoration and the smooth texture of the mousse. I typically chill the glasses as well, which helps maintain the mousse’s texture as it’s being served.
Step-by-Step Instructions
Now that we’ve covered the essential preparation techniques, let me walk you through the step-by-step process of creating this luxurious Baileys Chocolate Mousse. I’ve refined these steps through countless batches to ensure perfect results every time.
Creating the Mousse Base
- First, I finely chop the 300g of milk chocolate and place it in a large heatproof bowl. The finer the chop, the more evenly it will melt. I set this aside while preparing the cream.
- I measure out the full 375ml of whipping cream, then pour approximately half (about 185-190ml) into a small saucepan. This split is important—half for melting the chocolate, half for adding later to achieve the perfect consistency.
- I heat the cream in the saucepan over medium-high heat until it just reaches a boil. Timing is crucial here—I watch carefully for the first bubbles around the edges, then immediately remove it from the heat.
- Next comes the magic moment—I pour the hot cream directly over the chopped chocolate in the bowl. I resist the urge to stir immediately! Instead, I allow it to sit untouched for about 3-5 minutes. This gentle heat melts the chocolate without risk of seizing.
- After waiting, I begin whisking slowly from the center outward until the mixture becomes smooth and glossy. It’s important to whisk gently to avoid incorporating air at this stage.
- Once the chocolate has fully melted, I whisk in the remaining cold cream. This helps cool the mixture while achieving the right consistency. Then I add the star ingredient—125ml of Baileys Irish Cream—whisking until perfectly combined.
- I cover the bowl with plastic wrap, making sure it touches the surface of the mixture to prevent a skin from forming, and refrigerate it for at least 4 hours. Overnight is even better for flavor development.
Creating the Decorative Ganache
- About 30 minutes before I’m ready to whip the mousse, I prepare the ganache for decorating the glasses.
- I combine the 90g of chopped milk chocolate with 30g of cream and 1 teaspoon of Baileys in a small heatproof jug or bowl.
- I microwave this mixture on medium power (not high) in 30-second intervals, stirring between each burst. This careful melting usually takes 1-2 minutes total, depending on my microwave’s power.
- Once smooth, I transfer the ganache to a squeeze bottle or a small plastic bag with a tiny corner snipped off. If it’s too thick to pipe easily, I add just a few drops more cream.
- Working quickly before the ganache sets, I pipe decorative patterns inside my serving glasses. I often draw inspiration from the swirling pattern on the Baileys bottle itself, creating elegant loops around the inside of each glass.
- I immediately place the decorated glasses in the refrigerator to allow the ganache to set firm while I finish the mousse.
Whipping and Serving
- When I’m ready to serve, I remove the chilled chocolate-Baileys mixture from the refrigerator. It should be very cold and slightly thickened.
- Using an electric mixer with whisk attachments (or a stand mixer), I beat the mixture on medium-high speed. The transformation is magical—watching it gradually increase in volume and lighten in color.
- The critical moment comes when the mixture forms soft peaks. I watch carefully, looking for the point where the mousse holds its shape but still has a slight wobble. Overwhipping can quickly turn the texture grainy.
- Working efficiently, I spoon or pipe the whipped mousse into the prepared glasses, creating a smooth or decoratively swirled top as desired.
Serving, Storage, and Presentation Guidance
The beauty of this Baileys Chocolate Mousse lies not just in its flavor but in how it’s presented and enjoyed. Over the years, I’ve developed several techniques to enhance both the visual appeal and taste experience of this decadent dessert.
Serving Options
When it comes to serving this mousse, timing makes a significant difference in texture. I offer my guests two distinct experiences:
- Immediate serving: Right after whipping and portioning, the mousse has a softer, more cloudlike consistency that melts immediately on the tongue. I love this version for casual gatherings.
- Chilled serving: After 1-2 hours in the refrigerator, the mousse firms up slightly, creating a more substantial texture that slowly dissolves in the mouth. This is my preference for formal dinner parties, as it holds its shape beautifully on the spoon.
The temperature also affects flavor perception. I’ve found that removing the mousse from the refrigerator about 10-15 minutes before serving allows the Baileys notes to become more pronounced as the chill dissipates.
Storage Techniques
This mousse keeps beautifully in the refrigerator for 2-3 days, but proper storage is essential:
- I always cover individual servings with plastic wrap pressed directly against the surface of the mousse to prevent oxidation and texture changes.
- Alternatively, I place all the glasses in an airtight container, which protects them from absorbing refrigerator odors while maintaining humidity.
- I never freeze the finished mousse, as this dramatically alters its delicate texture. However, the unwhipped base can be frozen for up to a month and thawed overnight in the refrigerator before whipping.
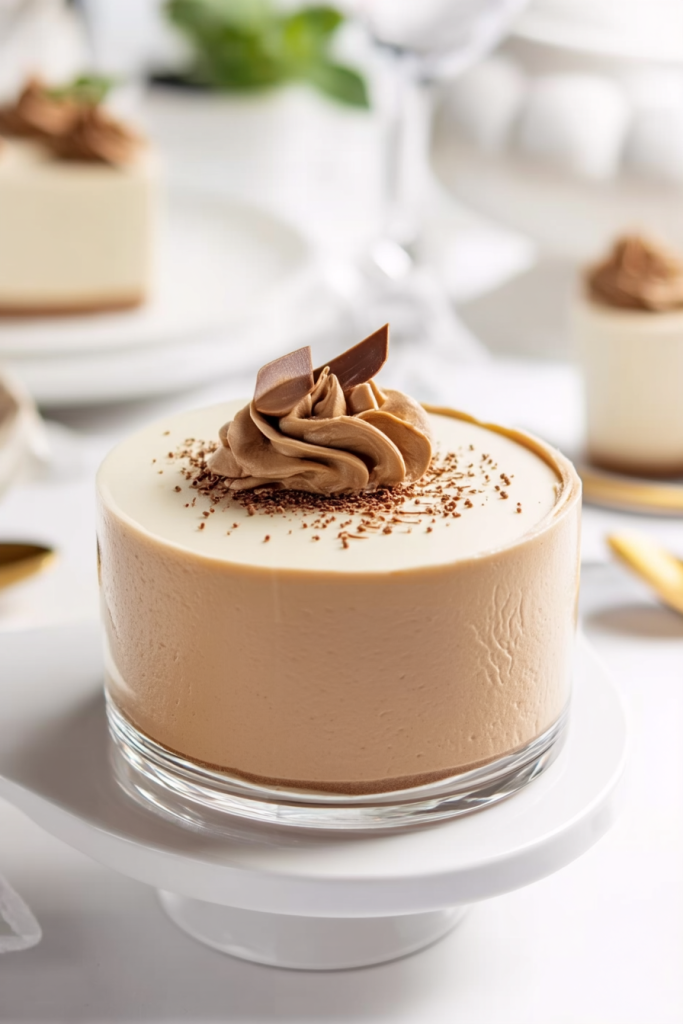
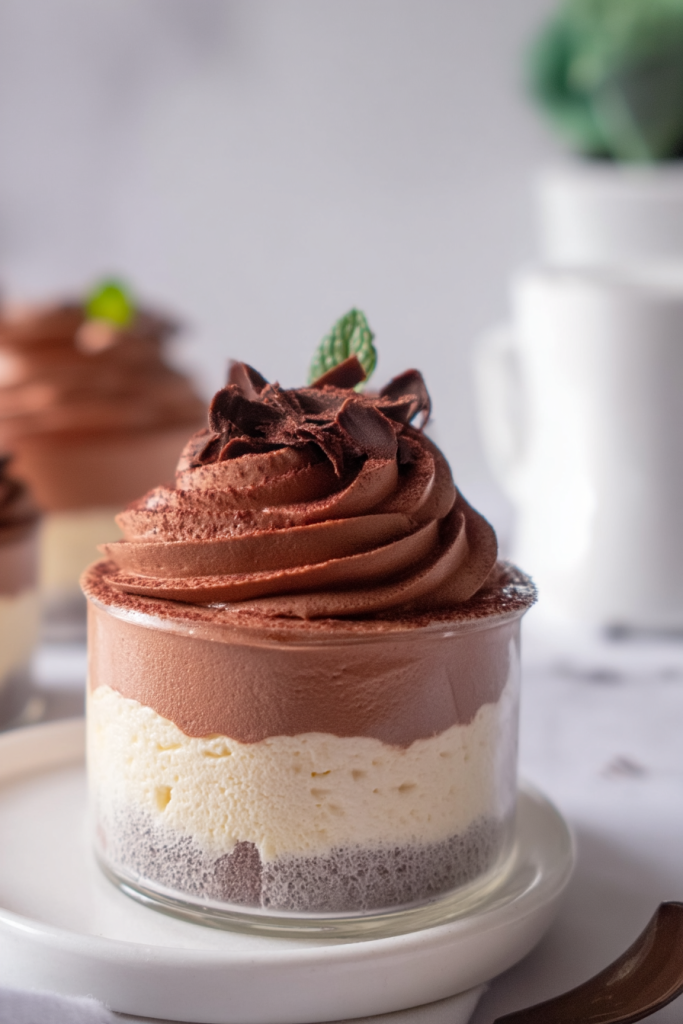
Presentation Enhancements
The decorative ganache creates a stunning visual effect, but I often add these final touches for maximum impact:
- A light dusting of cocoa powder or finely grated chocolate over the top adds texture and intensifies the chocolate aroma.
- For special occasions, I add a small chocolate decoration—like a thin chocolate curl or a small chocolate-covered coffee bean—placed precisely in the center.
- When serving to impress, I pair each glass with a small crisp cookie like a pirouline or a chocolate-dipped shortbread finger positioned elegantly on the serving plate.
- For a truly spectacular presentation, I sometimes create a “Baileys drizzle” by mixing equal parts Baileys and chocolate syrup, then drizzling it over the top of each mousse just before serving.
The contrast between the dark ganache decoration, the lighter mousse, and any additional garnishes creates a visual experience that perfectly complements the luxurious taste.
An Inspirational Conclusion
What began as my experiment to elevate a classic chocolate mousse has become one of my signature desserts, requested time and again by friends and family. There’s something magical about how the smooth, velvety texture carries the complex flavors of premium chocolate harmonized with Baileys Irish Cream.
I’ve served this mousse at milestone celebrations, intimate dinner parties, and sometimes simply made it as a special treat to mark the end of a long week. Each time, it transforms an ordinary moment into something memorable. The beauty of this dessert lies in its versatility—impressive enough for the most special occasions yet simple enough to create without stress.
What I cherish most about sharing this recipe is witnessing people’s first taste—that moment of surprised delight when they discover it’s not just another chocolate mousse. The Baileys brings warmth, complexity, and a certain sophisticated indulgence that elevates this dessert to something truly extraordinary.
I encourage you to make this recipe your own. Perhaps experiment with different quality chocolates to find your perfect match for the Baileys, or develop your signature decorative pattern for the ganache. The recipe is forgiving enough for beginners yet offers depth for those who love to perfect their techniques.
Remember that cooking—especially dessert-making—is about creating moments of joy. This Baileys Chocolate Mousse has been the centerpiece of many such moments in my life, and I hope it brings the same pleasure to your table. Whether you’re celebrating something special or simply treating yourself to a moment of indulgence, this dessert honors the occasion with its beautiful simplicity and unforgettable flavor.