If you’re a fan of Southern-style banana pudding, then this Banana Pudding Cake is going to completely steal your heart! It’s everything you love about the classic dessert—creamy, dreamy banana pudding, fresh banana slices, and crunchy vanilla wafers—turned into a show-stopping layer cake. This cake is moist, flavorful, and full of nostalgic comfort. Each bite is a little slice of heaven, with layers of fluffy banana cake, luscious homemade banana pudding, and clouds of whipped cream. It’s perfect for birthdays, holidays, or any time you’re craving a dessert that’s as fun as it is delicious!
About the Recipe
This recipe was born out of my family’s deep love for banana pudding. Growing up, banana pudding was a staple at nearly every gathering, and it always disappeared fast. So naturally, I had to find a way to turn it into cake form—and wow, did it deliver!
The banana cake layers are soft and tender with just the right amount of banana flavor (thanks to banana extract and sour cream), while the homemade banana pudding filling adds that creamy, dreamy center that makes this cake unforgettable. And we’re not stopping there! It’s finished off with a generous amount of fluffy whipped cream and, of course, banana slices and Nilla wafers.
What I really love about this recipe is how fun and nostalgic it feels—but with a made-from-scratch twist. Whether you’re baking for a crowd or just to satisfy a serious banana craving, this one always impresses!
Reasons You Will Love This Banana Pudding Cake
- It tastes just like banana pudding—only better!
- Made completely from scratch (yes, even the pudding!).
- Full of layers of flavor and texture.
- The cake is ultra moist, light, and packed with banana flavor.
- Perfect for spring and summer gatherings, birthdays, or potlucks.
- A crowd-pleasing, eye-catching dessert that’s easier than it looks!
Equipment Needed
- 3 (8-inch) Round Cake Pans
- Stand Mixer or Hand Mixer
- Mixing Bowls
- Whisk
- Spatula
- Medium Saucepan
- Sieve or Fine Mesh Strainer
- Cooling Racks
- Offset Spatula
Ingredients
For the Homemade Banana Pudding:
- 1 ¼ cups whole milk
- ¼ cup heavy whipping cream
- 2 large eggs (room temperature)
- 1 egg yolk (room temperature)
- ⅓ cup granulated sugar
- 3 tablespoons cornstarch
- 2 tablespoons unsalted butter, cubed
- 1 ½ teaspoons vanilla extract
- 1 teaspoon banana extract
- ¼ teaspoon kosher salt
Description:
- Whole Milk & Cream – Create a rich, silky pudding base.
- Eggs – Help thicken the pudding and give it a custard-like texture.
- Cornstarch – Provides structure and extra thickening power.
- Butter – Adds richness and a smooth finish.
- Banana & Vanilla Extracts – Give the pudding its signature banana flavor with a hint of warmth.
- Salt – Balances the sweetness and enhances the overall taste.
For the Banana Cake:
- ⅔ cup vegetable oil
- ⅓ cup unsalted butter (room temperature)
- 1 ½ cups granulated sugar
- 3 large eggs (room temperature)
- 2 ¾ cups all-purpose flour, sifted
- 1 ½ teaspoons baking powder
- 1 teaspoon salt
- ½ teaspoon baking soda
- 1 ¼ cups sour cream (room temperature)
- ⅓ cup whole milk
- 1 tablespoon vanilla extract
- 1 tablespoon banana extract
Description:
- Oil & Butter – The perfect blend for flavor and moist texture.
- Sour Cream & Milk – Create a tender, rich crumb.
- Flour & Leaveners – Provide structure and rise.
- Banana Extract – Enhances the natural banana notes for a bolder taste.
For the Whipped Cream:
- 2 cups heavy whipping cream
- 2 tablespoons granulated sugar
- 1 teaspoon vanilla extract
For Assembly:
- 2 large bananas, sliced (¼-inch thick)
- Nilla Wafers (whole and crushed)
How to Make Banana Pudding Cake
Step 1: Make the Homemade Banana Pudding
This creamy, flavorful pudding is what sets this cake apart from all the rest!
Start by adding the whole milk and heavy cream to a medium saucepan set over medium heat. Stir frequently and bring the mixture to a gentle simmer.
While that’s heating, whisk together the eggs, egg yolk, sugar, and cornstarch in a separate bowl until smooth and well combined. You want a silky, pale yellow mixture.
Now temper the eggs by gradually adding a few spoonfuls of the hot milk into the egg mixture, whisking constantly to avoid scrambling the eggs. Once tempered, slowly pour the egg mixture back into the saucepan.
Cook over medium-low heat, whisking constantly for 4–6 minutes until it thickens and coats the back of a spoon. (You can check with a thermometer—it should be between 170–175°F.)
Once thick, remove from the heat and stir in the butter, vanilla extract, banana extract, and salt. Strain the pudding through a fine mesh sieve into a clean bowl to ensure a smooth finish. Press plastic wrap directly against the surface of the pudding to prevent a skin from forming, and refrigerate for at least 2 hours until set.
Step 2: Make the Banana Cake Layers
Preheat your oven to 325°F (165°C). Grease and flour three 8-inch round cake pans or spray generously with non-stick baking spray. Set aside.
In the bowl of a stand mixer, beat together the oil and softened butter for 2 minutes on high speed until smooth and well combined. Slowly stream in the granulated sugar and beat for another 4–5 minutes until the mixture is pale and fluffy.
Add in the eggs one at a time, mixing well and scraping the sides of the bowl between each addition.
Turn the mixer to low and gradually add the sifted flour, baking powder, baking soda, and salt in two batches, being careful not to overmix. Then add in the sour cream, milk, vanilla extract, and banana extract, and beat until just combined.
Evenly divide the batter between the three prepared pans and smooth the tops. Bake for 15–25 minutes, or until a toothpick inserted into the center comes out with just a few moist crumbs.
Allow the cakes to cool in the pans for 10–15 minutes, then turn out onto cooling racks to cool completely.
Assemble and Decorate
Now for the fun part—putting it all together!
Step 1: Layer the Cake
Place your first cake layer on a cake stand or serving plate. Spoon half of the chilled banana pudding onto the cake and gently spread it evenly, leaving about a ¼-inch border around the edge.
Starting from the outside and working your way in, alternate Nilla wafers and sliced bananas in a circular pattern on top of the pudding layer. This not only adds that signature banana pudding texture but also gives each slice that wow factor!
Top with the second cake layer and repeat the process: pudding, bananas, and Nilla wafers.
Place your final cake layer on top and press down gently to secure.
Step 2: Frost with Whipped Cream
To make the whipped cream, use a cold bowl and whisk (this helps the cream whip up faster and fluffier). Beat the heavy whipping cream, sugar, and vanilla until stiff peaks form.
Frost the entire cake generously with the whipped cream, using an offset spatula to get those smooth sides and soft, creamy swoops on top.
If you’re feeling extra, pipe rosettes or decorative swirls on the top using a piping bag and your favorite piping tip.
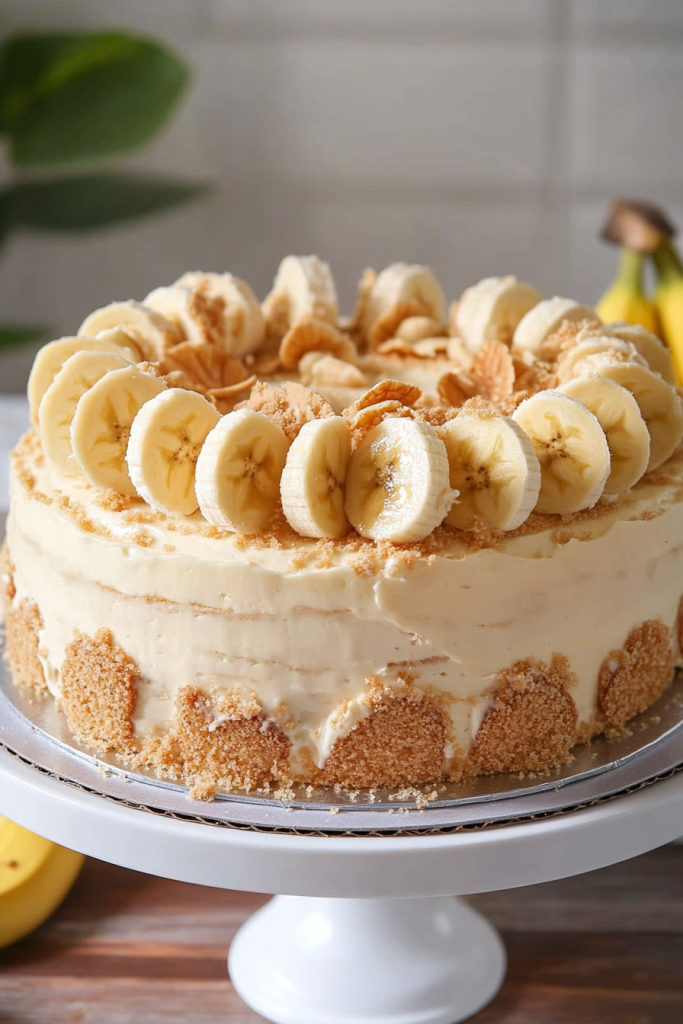
Step 3: Garnish
To finish, tuck banana slices and Nilla wafers in between the rosettes on top. You can also press crushed Nilla wafers along the bottom edge of the cake for a rustic, bakery-style finish.
Chill the cake for at least 2 hours before serving to allow the pudding and cream to firm up and for all the flavors to meld together perfectly.
Storing and Serving Tips
Because this cake includes banana slices and homemade pudding, it should be refrigerated until ready to serve. Let it sit out at room temperature for 15–30 minutes before slicing for the best texture and flavor.
Store any leftover cake in an airtight container in the fridge. It’ll keep well for 2–3 days, but as with most fresh banana desserts, it’s best enjoyed sooner rather than later.
I wouldn’t recommend freezing this one—banana pudding and whipped cream just don’t thaw well.
And there you have it—Banana Pudding Cake that tastes just like your favorite childhood dessert but in a dreamy, layered cake form!