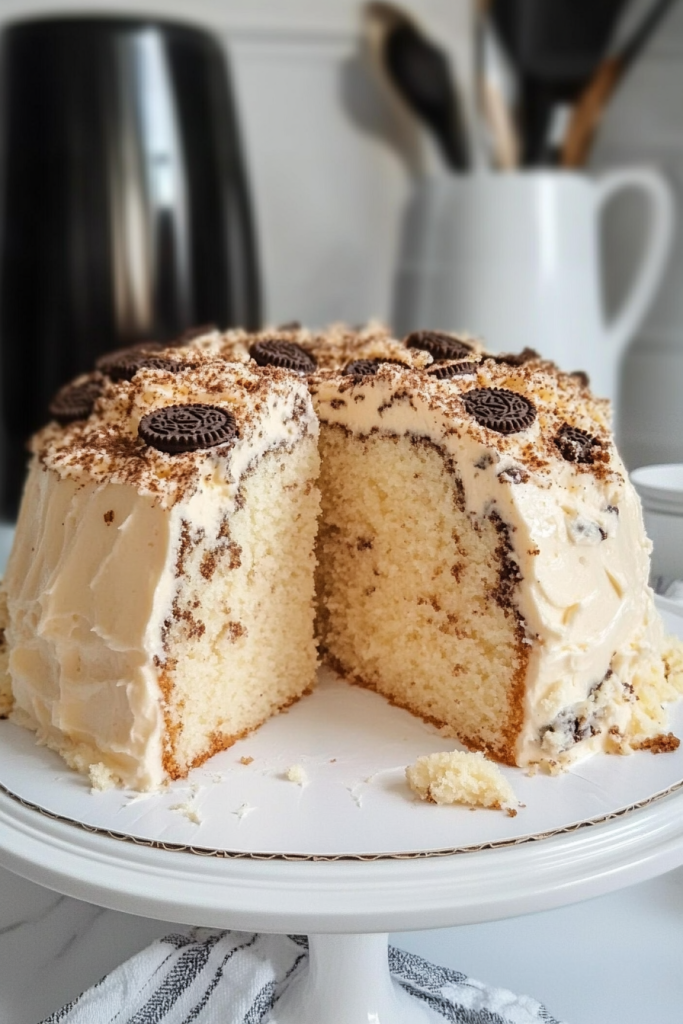
If you love rich, buttery pound cakes with a little twist, then this Blondie Oreo Buttermilk Pound Cake is about to become your new favorite dessert! It combines the moist, tender crumb of a classic buttermilk pound cake with the crunch of Golden Oreos and a hint of butterscotch. Every bite is a perfect balance of buttery, sweet, and slightly tangy flavors, making it a true crowd-pleaser for any occasion.
Topped with a luscious cream cheese glaze and a sprinkle of crushed Oreos, this cake is as stunning as it is delicious. The best part? It’s easy to make and bakes to perfection with a unique no-preheat oven method. Whether you’re baking for a holiday, special event, or just a weekend indulgence, this cake is bound to impress!
About the Recipe
Some desserts just have that “wow” factor, and this pound cake is one of them. It all started when I wanted a dessert that combined the nostalgia of Golden Oreos with the rich, buttery goodness of a classic pound cake. And let me tell you—this recipe did not disappoint!
This isn’t just any pound cake. It’s a next-level version that features:
- A moist, buttery texture thanks to buttermilk and sour cream.
- Golden Oreos crushed right into the batter for a sweet, crunchy contrast.
- A subtle butterscotch flavor from instant pudding mix, which enhances the richness of the cake.
- A silky, smooth cream cheese glaze that ties everything together beautifully.
And the real secret? Baking this cake in a cold oven. Instead of preheating, we start from a cool oven and let the cake heat up gradually, creating an even, soft crumb that melts in your mouth.
This cake is a total game-changer. It’s got all the best parts of a classic pound cake but with an irresistible twist!
Why You Will Love This Cake
There are so many reasons to love this Blondie Oreo Buttermilk Pound Cake! Here are just a few:
✔ Perfectly Moist & Buttery – The combination of butter, buttermilk, and sour cream makes every bite ultra-soft and flavorful.
✔ Golden Oreo Crunch – The crushed Oreos inside the cake add texture and a sweet vanilla flavor.
✔ Subtle Butterscotch Notes – The instant pudding mix enhances the richness and gives a warm, caramel-like depth to the cake.
✔ No-Preheat Baking Method – Starting in a cold oven helps achieve an even bake and a tender crumb.
✔ Simple Yet Stunning – A drizzle of cream cheese glaze and extra Oreo crumbs make this cake look as good as it tastes!
This cake is perfect for birthdays, family gatherings, holidays, or just because you deserve a treat. Once you take your first bite, you’ll be hooked!
Equipment Needed
Before we dive into the ingredients, let’s make sure you have all the necessary tools to make this cake:
- Mixing Bowls – For combining your dry and wet ingredients separately.
- Whisk – Helps ensure even distribution of dry ingredients.
- Stand Mixer or Hand Mixer – To cream the butter and sugar properly.
- Bundt Pan or Tube Pan – The classic choice for pound cakes, ensuring an even bake.
- Sifter – To aerate the cake flour and mix in the dry ingredients smoothly.
- Spatula – For folding in the crushed Oreos without overmixing.
- Cooling Rack – Essential for allowing the cake to set properly before glazing.
Having the right tools makes a huge difference in achieving that perfectly moist and tender texture!
Ingredients
For the Pound Cake:
- 3 cups cake flour (sifted for a light texture)
- ½ teaspoon baking powder (helps with just the right amount of lift)
- ½ teaspoon salt (balances the sweetness)
- 3 oz instant butterscotch pudding mix (adds richness and depth)
- 3 cups granulated sugar (for perfect sweetness)
- 4 sticks (2 cups) salted butter, room temperature (provides a rich, buttery flavor)
- 5 large eggs, room temperature (adds structure and richness)
- 8 oz buttermilk, room temperature (creates a tender crumb and slight tang)
- 2 tablespoons sour cream, room temperature (adds extra moisture)
- 3 teaspoons vanilla extract (for warmth and depth of flavor)
- 1 cup crushed Golden Oreos (folded into the batter for added crunch)
For the Cream Cheese Glaze:
- 12 oz cream cheese, room temperature (for a smooth and creamy glaze)
- ½ stick (¼ cup) butter, room temperature (adds richness)
- 2 teaspoons vanilla extract (for enhanced flavor)
- 1 tablespoon heavy whipping cream (for the perfect consistency)
- 3 cups powdered sugar (sifted to ensure a silky glaze)
- 2-3 drops yellow food coloring (optional, for a golden hue)
- Crushed Golden Oreos for garnish (sprinkled on top for a final touch)
Ingredient Notes & Substitutions
- Cake Flour vs. All-Purpose Flour: Cake flour is recommended for a lighter texture. If you only have all-purpose flour, you can make your own by removing 6 tablespoons from 3 cups of all-purpose flour and replacing it with 6 tablespoons of cornstarch.
- Salted vs. Unsalted Butter: Since this recipe calls for salted butter, you don’t need to add extra salt. If using unsalted butter, increase the salt to 1 teaspoon.
- Buttermilk Alternative: If you don’t have buttermilk, mix 1 cup of milk with 1 tablespoon of vinegar or lemon juice and let it sit for 5 minutes.
How to Make Blondie Oreo Buttermilk Pound Cake
Step 1: Prepare the Dry Ingredients
- Sift the cake flour into a large mixing bowl.
- Stir in the baking powder, salt, and instant butterscotch pudding mix. Set aside.
Sifting the dry ingredients ensures a light, even texture and prevents clumping.
Step 2: Mix the Wet Ingredients
- In a separate bowl, combine the buttermilk, vanilla extract, and sour cream.
- Stir until smooth and set aside.
This mixture adds moisture, tang, and flavor to the cake, helping create a perfectly tender crumb.
Step 3: Cream the Butter and Sugar
- In a stand mixer or with a hand mixer, beat the butter and sugar on medium speed for 6-8 minutes until light and fluffy.
Pro Tip: The longer you cream the butter and sugar, the more air gets incorporated, giving you a lighter pound cake!
Step 4: Add the Eggs
- Reduce the mixer speed to low.
- Add the eggs one at a time, making sure each yolk disappears before adding the next.
This ensures a smooth, even batter and prevents the cake from becoming too dense.
Step 5: Combine the Dry and Wet Mixtures
- With the mixer on low, gradually alternate adding the flour mixture and the buttermilk mixture, beginning and ending with the dry ingredients.
- Mix just until combined—do not overmix, as this can make the cake tough.
Alternating the dry and wet ingredients keeps the batter well-balanced and prevents overworking the gluten.
Step 6: Fold in the Golden Oreos
- Gently fold in 1 cup of crushed Golden Oreos with a spatula.
- Stir until evenly distributed but be careful not to overmix.
The Oreos add an incredible crunch and sweetness, making every bite more exciting!
Step 7: Prepare the Pan & Bake
- Generously grease and flour a bundt or tube pan.
- Pour the batter into the pan and tap it on the counter a few times to release air pockets.
- Place the cake in a cold oven—do not preheat.
- Set the oven to 300°F (150°C) and bake for 1 hour and 15 minutes, checking with a long toothpick.
- Continue checking every 5 minutes until a toothpick inserted comes out with a few moist crumbs.
Baking in a cold oven allows for even heat distribution, resulting in a more tender cake!
Step 8: Cool and Flip
Let the cake rest in the pan for 10 minutes after baking.
- Carefully flip it onto a cake plate or wire rack.
Cooling slightly before flipping helps prevent breaking or sticking.
How to Make the Cream Cheese Glaze
Step 1: Beat the Cream Cheese & Butter
- In a large mixing bowl, beat cream cheese and butter on medium speed until smooth and creamy.
- Scrape down the sides of the bowl to ensure everything is fully incorporated.
Pro Tip: Make sure both the cream cheese and butter are at room temperature for a silky-smooth glaze.
Step 2: Add the Flavor & Sugar
- Mix in the vanilla extract and heavy whipping cream.
- Gradually sift in powdered sugar, mixing on low speed at first to avoid a sugar cloud.
- Increase speed and beat until smooth.
If the glaze is too thick, add an extra teaspoon of heavy cream until you reach the perfect pourable consistency.
Step 3: Add a Pop of Color (Optional)
- Stir in 2-3 drops of yellow food coloring to give the glaze a golden hue.
- Mix until evenly combined.
This step is completely optional but adds a beautiful touch to the finished cake!
Assemble & Decorate
Step 1: Pour the Glaze Over the Cake
- Once the cake is almost cool, drizzle the cream cheese glaze evenly over the top, letting it cascade down the sides.
- Allow the glaze to set for a few minutes before adding garnishes.
Step 2: Garnish with Golden Oreos
- Crush a few extra Golden Oreos and sprinkle them on top for added crunch and visual appeal.
- Let the cake fully cool before storing or slicing.
Now you have a stunning, bakery-worthy Blondie Oreo Buttermilk Pound Cake ready to impress!
Storage & Make-Ahead Tips
- At Room Temperature: Store the cake in an airtight container for up to 3 days.
- In the Refrigerator: Keep it covered in the fridge for up to 1 week.
- Freezing: Slice and wrap individual pieces in plastic wrap, then freeze for up to 3 months. Let thaw at room temperature before serving.
FAQ’s & Troubleshooting
Why do you start baking in a cold oven?
This technique allows for a slow, even rise, giving the pound cake a softer, more tender crumb without cracking on top.
Can I use chocolate Oreos instead?
Absolutely! If you prefer a richer, more chocolatey twist, swap the Golden Oreos for classic chocolate Oreos.
My cake came out dry—what went wrong?
- Overmixing the batter can create a tough texture.
- Overbaking can dry it out—start checking for doneness at the 1 hour 15-minute mark.
- Make sure all wet ingredients (buttermilk, butter, eggs, sour cream) are room temperature for proper mixing.
Final Thoughts
This Blondie Oreo Buttermilk Pound Cake is a unique and flavorful take on a classic dessert. The combination of buttery richness, crunchy Golden Oreos, and a silky cream cheese glaze makes this cake completely irresistible! Whether you’re making it for a special occasion or just because, it’s sure to be a showstopper.
So, grab your ingredients, preheat that oven (just kidding—keep it cold!), and get ready to bake a cake that everyone will be asking for again and again!