Who doesn’t love the bold, comforting flavors of a warm cappuccino? Now imagine that rich coffee aroma blended into a decadent layer cake! The Cappuccino Layer Cake combines moist cake layers infused with espresso and a creamy coffee mousse that will tantalize your taste buds. Each bite delivers a harmonious mix of sweetness and the boldness of coffee, making it the perfect dessert for coffee lovers everywhere.
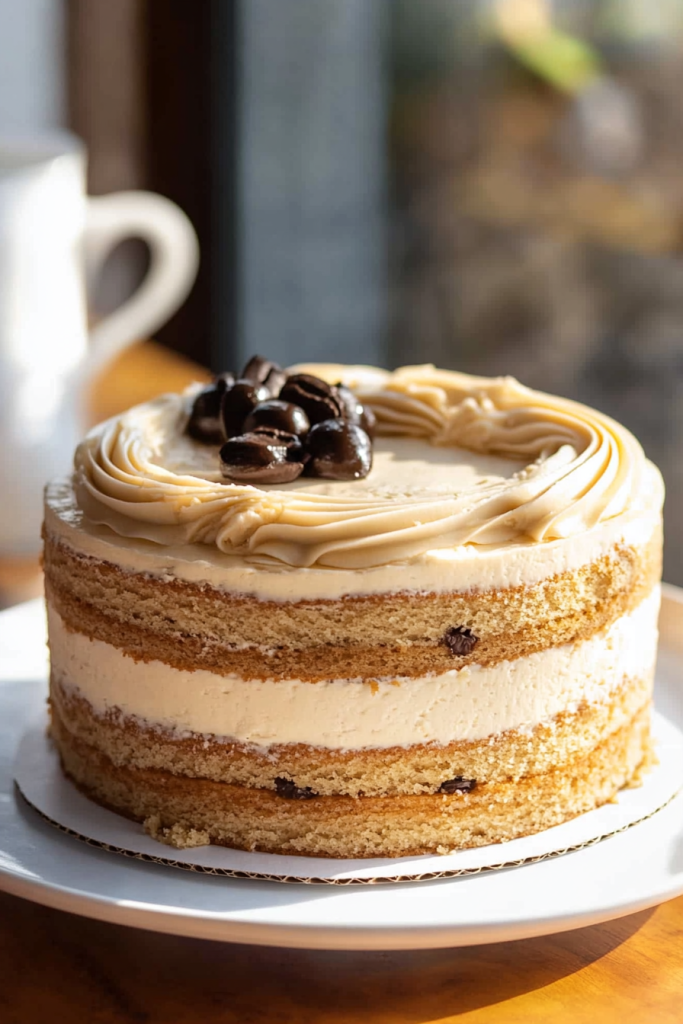
This cake isn’t just delicious; it’s also stunning to look at. With its layers of soft sponge, smooth mousse, and elegant coffee-flavored decorations, it’s sure to impress your guests at any gathering. Whether it’s a birthday, a holiday dinner, or just a cozy weekend treat, this cappuccino layer cake is guaranteed to steal the show.
About the Recipe
Creating this recipe was a labor of love, inspired by my passion for coffee and desserts. I wanted a cake that not only captured the essence of a cappuccino but also showcased the balance of flavors and textures. After countless attempts to perfect the layers and mousse, I’ve finally created a cake that’s worthy of its name.
What sets this cake apart is the combination of bold espresso flavors, velvety mousse, and the delicate sweetness of the sponge. Plus, the assembly process is so much fun and easier than it looks!
Reasons You’ll Love This Cappuccino Layer Cake:
- Perfect for coffee enthusiasts.
- Combines a fluffy sponge with a creamy mousse.
- Elegant enough for special occasions.
- Balanced sweetness with the bold taste of coffee.
- A showstopper on any dessert table!
Equipment Needed
Before diving into the recipe, let’s make sure you have all the necessary tools to create this stunning cappuccino layer cake. Here’s what you’ll need:
- Mixing Bowls: At least two, one for dry ingredients and another for wet ingredients.
- Electric Mixer: A hand or stand mixer works great for beating the batter and whipping the mousse.
- 9×13 Baking Pan: For baking the cake layers.
- 6-Inch Cake Ring: To cut and assemble the layers.
- Cake Collar: Helps create smooth and clean edges for your mousse layers.
- Piping Bag with Star Tip: For decorative finishing touches.
- Spatula: To spread and layer the mousse evenly.
- Cooling Rack: Essential for cooling the cake layers before assembly.
Ingredients
For the Cake:
- 4 tablespoons salted butter: Adds richness to the cake.
- ½ cup granulated sugar: Sweetens the sponge perfectly.
- ¼ cup brown sugar: Enhances the flavor with a touch of molasses.
- 2 large eggs: Provides structure and moisture.
- ⅓ cup sour cream: Keeps the cake moist and tender.
- 1 teaspoon vanilla extract: Adds a hint of warmth to complement the coffee flavor.
- 1½ cups all-purpose flour: Creates the perfect base for the cake.
- 1 tablespoon instant espresso powder: The key to that bold cappuccino flavor.
- 1½ teaspoons baking powder: Ensures the cake rises beautifully.
- ½ cup milk: Combines the ingredients into a smooth batter.
For the Coffee Mousse:
- 4 ounces cream cheese: Adds a tangy creaminess.
- 8 ounces heavy cream: Whipped into light peaks for a fluffy texture.
- 1¼ cups powdered sugar: Divided, for sweetness and stability.
- 1 tablespoon instant coffee: Dissolved for a bold coffee flavor.
These ingredients come together to create a truly indulgent treat that highlights the irresistible charm of coffee in every layer.
How to Make Cappuccino Layer Cake
Instructions for the Cake
- Preheat and Prepare:
Preheat your oven to 350°F (175°C). Line a 9×13 baking pan with parchment paper to ensure easy removal of the cake later. - Cream the Butter and Sugars:
In a large mixing bowl, cream together the salted butter, granulated sugar, and brown sugar using an electric mixer. Beat until light and fluffy, about 2-3 minutes. - Add the Wet Ingredients:
Add the eggs one at a time, mixing well after each addition. Stir in the sour cream and vanilla extract until the mixture is smooth and well combined. - Combine the Dry Ingredients:
In a separate bowl, whisk together the all-purpose flour, instant espresso powder, and baking powder. This step ensures the coffee flavor is evenly distributed. - Mix the Batter:
Gradually add the dry ingredients to the wet mixture in three parts, alternating with the milk. Begin and end with the dry ingredients. Mix until just combined—don’t overmix to keep the cake tender. - Bake:
Spread the batter evenly into the prepared baking pan. Bake for 15-18 minutes or until a toothpick inserted into the center comes out clean. Allow the cake to cool completely on a cooling rack before assembling.
Instructions for the Coffee Mousse
- Whip the Cream:
In a mixing bowl, whip the heavy cream with 2 tablespoons of powdered sugar until stiff peaks form. Transfer to a separate bowl and set aside. - Prepare the Cream Cheese Mixture:
In another bowl, beat the cream cheese and remaining powdered sugar until smooth and fluffy. Dissolve the instant coffee in a small amount of warm water, then mix it into the cream cheese mixture until fully incorporated. - Fold in the Whipped Cream:
Gently fold ¼ of the whipped cream into the cream cheese mixture to lighten it. Then, carefully fold in the remaining whipped cream in two batches. This will create a light, airy mousse perfect for layering.
Assembly Instructions
- Cut the Cake Layers:
Once the cake has cooled completely, use a 6-inch cake ring to cut two full circles and two half circles from the cake. Save the remaining scraps to fill in any gaps during assembly. - Prepare the Cake Ring and Collar:
Place the cake ring on your serving plate or a flat surface. Line the inside of the ring with a cake collar to ensure clean and even edges. - First Layer:
Position the two half circles at the bottom of the ring to form a complete layer. Use cake scraps to fill any gaps. Press gently to ensure an even base. - Add the Mousse:
Pipe a ring of coffee mousse around the edge of the layer using a piping bag. Spread half of the remaining whipped cream in the center. Smooth it out with a spatula. - Second Layer:
Add one of the full cake circles on top of the mousse. Repeat the process of piping a mousse ring around the edge and spreading the remaining whipped cream in the center. - Top Layer:
Place the final cake circle on top. Spread a thin layer of mousse over the entire surface to create a smooth finish. Pipe decorative florets around the edges using a star tip.
Decorating the Cake
- Coffee Beans:
Place chocolate-covered coffee beans on each mousse floret for an elegant finishing touch. - Optional Garnishes:
Dust the top of the cake with cocoa powder or espresso powder for a professional look. You can also add a drizzle of chocolate ganache or caramel for added flair.
Chilling and Serving
- Chill the Cake:
Refrigerate the assembled cake for at least 3-4 hours, or preferably overnight. This allows the mousse to set and the flavors to meld beautifully. - Serve:
Carefully remove the cake ring and peel off the cake collar before serving. Slice with a clean, sharp knife for neat servings.
FAQ’s and Troubleshooting
Can I prepare this cake in advance?
Yes! This cake can be made a day ahead and stored in the refrigerator. It tastes even better the next day as the flavors deepen.
Why is my mousse not fluffy?
Make sure your heavy cream is whipped to stiff peaks before folding it into the cream cheese mixture. Also, be gentle while folding to retain the airiness.
Can I skip the coffee flavor?
Absolutely! Replace the espresso powder and instant coffee with cocoa powder or vanilla extract for a kid-friendly or non-coffee version.
This cappuccino layer cake is a showstopper that’s as fun to make as it is to eat.


