There’s nothing quite like the nostalgic taste of a classic Ding Dong Cake—a rich, moist chocolate cake layered with fluffy vanilla filling and covered in a silky, decadent ganache. If you grew up loving those little chocolate snack cakes, then get ready for an even better homemade version. This cake takes everything you love about the classic treat and turns it into an indulgent, bakery-worthy dessert that’s perfect for any occasion!
About The Recipe
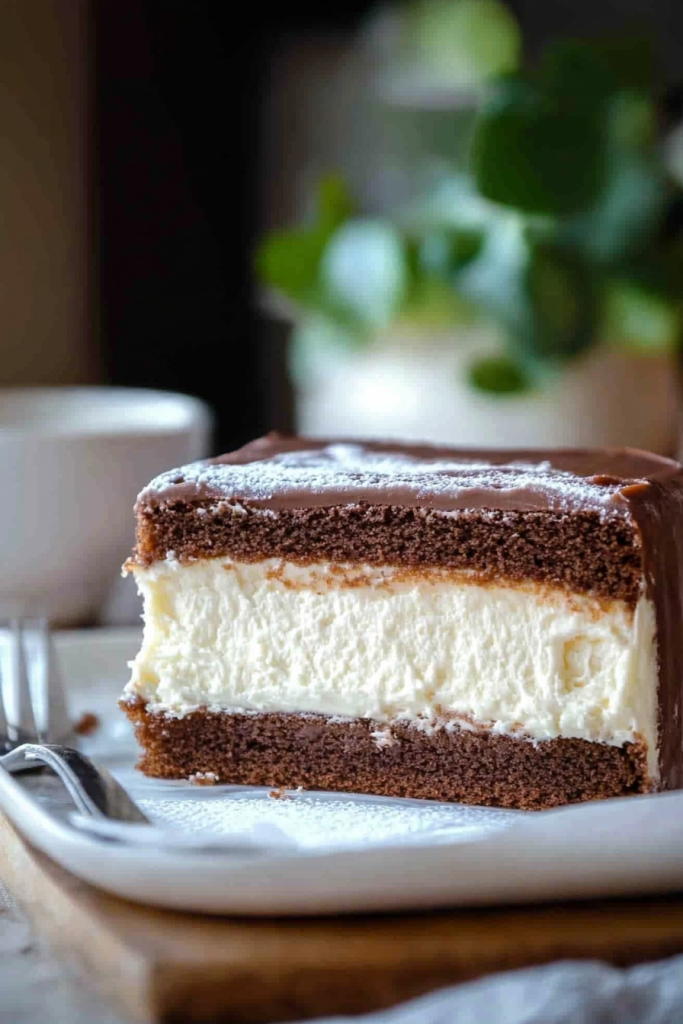
Chocolate cake lovers, this one’s for you! A Ding Dong Cake is basically a homemade version of the famous snack cake by Hostess, but it’s bigger, better, and made from scratch. It features two layers of moist chocolate cake, a light and creamy vanilla filling, and a glossy chocolate ganache that ties it all together.
I’ve spent plenty of time perfecting this recipe to ensure it’s as moist, rich, and flavorful as possible. The key? A combination of cocoa powder, buttermilk, and hot coffee in the cake batter—this trio creates the ultimate chocolate cake that’s soft, tender, and deeply chocolatey.
But the filling is just as important! Unlike a buttercream, this filling is whipped, fluffy, and lightly sweetened, giving the perfect contrast to the rich chocolate layers. And finally, the ganache—smooth, silky, and absolutely irresistible.
Trust me, once you make this homemade Ding Dong Cake, you’ll never want to go back to the packaged version!
Why You’ll Love This Ding Dong Cake
- Rich & Moist Chocolate Cake – The cake itself is incredibly soft, thanks to the perfect blend of ingredients.
- Creamy, Fluffy Filling – A light and airy vanilla filling that complements the deep chocolate flavor.
- Decadent Ganache – A smooth and shiny chocolate ganache that makes this cake look and taste like a dream.
- Perfect for Any Occasion – Birthdays, holidays, or just because—you don’t need an excuse to enjoy this!
- Better Than Store-Bought – Skip the packaged cakes and make a homemade version that’s fresher and more delicious.
Equipment Needed
Before we dive into the ingredients, let’s make sure you have everything you need to bake this delicious Ding Dong Cake. Having the right tools on hand will make the process much smoother!
- Mixing Bowls – You’ll need a few for mixing the cake batter, filling, and ganache.
- Whisk & Electric Mixer – A hand whisk is great for dry ingredients, but an electric mixer (handheld or stand mixer) is best for creaming butter and whipping the filling.
- 8-Inch Cake Pans – Two round cake pans ensure even baking and the perfect layered cake.
- Medium Saucepan – Needed to make the thickened filling base and ganache.
- Cake Leveler or Serrated Knife – Helps to even out cake layers for a professional-looking finish.
- Cooling Rack – For cooling the cakes before assembly.
- Offset Spatula – Great for spreading filling and smoothing the ganache.
Ingredients
Each ingredient in this recipe plays a crucial role in creating the perfect Ding Dong Cake. Let’s break it down!
For The Cake:
- 1 ¾ cups (205 g) all-purpose flour – The base of the cake, giving it structure and texture.
- 1 cup (200 g) brown sugar – Adds moisture and a slight caramel undertone.
- 1 cup (200 g) granulated sugar – Balances the sweetness and enhances texture.
- ¾ cup (75 g) natural cocoa powder – The key to a deep chocolate flavor.
- 1 ½ teaspoons baking soda – Helps the cake rise and stay soft.
- ¾ teaspoon salt – Brings out the chocolate flavor and balances the sweetness.
- ½ cup (113 g) unsalted butter, melted – Adds richness and flavor.
- ½ cup (118 ml) neutral cooking oil – Helps keep the cake moist.
- 2 large eggs + 1 egg yolk, room temperature – The eggs provide structure and moisture.
- 2 teaspoons vanilla extract – Enhances the overall flavor.
- 1 cup (236 ml) buttermilk, room temperature – Adds acidity, tenderness, and a slight tang.
- ½ cup (118 ml) hot coffee – Deepens the chocolate flavor and enhances the cake’s texture.
For The Filling:
- 1 cup (200 g) granulated sugar – Sweetens the filling.
- 5 Tablespoons (40 g) all-purpose flour – Thickens the filling base.
- ¼ teaspoon salt – Balances the sweetness.
- 1 cup (236 ml) whole milk – Creates the creamy base.
- 1 cup (226 g) unsalted butter, softened – Makes the filling light and fluffy.
- 1 teaspoon clear vanilla extract – Keeps the filling white and enhances the flavor.
For The Ganache Frosting:
- 8 oz (226 g) semi-sweet chocolate – Gives the ganache its deep chocolate flavor.
- 1 cup (236 ml) heavy whipping cream – Makes the ganache smooth and glossy.
Ingredient Notes & Substitutions
- Why Use Buttermilk? Buttermilk makes the cake ultra-soft and tender. If you don’t have it, you can make a substitute by adding 1 tablespoon of vinegar or lemon juice to 1 cup of milk and letting it sit for 5 minutes.
- Hot Coffee vs. Hot Water? Coffee enhances the deep chocolate flavor without making the cake taste like coffee. If you prefer, you can use hot water instead.
- Can I Use Regular Vanilla Extract? Yes! I prefer clear vanilla for the filling because it keeps it bright white, but regular vanilla extract works just as well.
- Semi-Sweet Chocolate vs. Dark Chocolate? I use semi-sweet chocolate for the ganache, but if you prefer a more intense chocolate flavor, you can swap it for dark chocolate.
How to Make the Perfect Ding Dong Cake
Now that we have all our ingredients and equipment ready, let’s walk through the process of making this delicious homemade Ding Dong Cake.
Step 1: Make the Cake
- Preheat & Prep – Preheat your oven to 350°F (175°C). Line two 8-inch round cake pans with parchment paper and lightly grease the sides with butter or baking spray. This prevents sticking and makes removal easier.
- Mix Dry Ingredients – In a large mixing bowl, whisk together flour, both sugars, cocoa powder, baking soda, and salt. This ensures an even distribution of ingredients.
- Add Wet Ingredients – Pour in the melted butter and oil, stirring until fully combined. Then, mix in the eggs, egg yolk, and vanilla extract until smooth.
- Incorporate Liquids – Slowly add the buttermilk, stirring gently. Then, carefully pour in the hot coffee while continuously mixing. The batter will be thin, but this is what makes the cake extra moist!
- Bake – Divide the batter evenly between the prepared cake pans and bake for 33-35 minutes. You’ll know it’s ready when a toothpick inserted in the center comes out clean or with a few moist crumbs.
- Cool the Cakes – Allow the cakes to cool in their pans for about 15 minutes before transferring them to a wire rack. Let them cool completely before assembling.
Step 2: Prepare the Filling
While the cakes are cooling, we can move on to making the light and fluffy vanilla filling.
- Cook the Base – In a medium saucepan, whisk together sugar, flour, and salt until combined. Slowly pour in the milk, whisking constantly to prevent lumps.
- Thicken the Mixture – Heat over medium heat, stirring constantly, until the mixture thickens to a pudding-like consistency. It should be thick enough that a whisk leaves a visible trail.
- Cool Completely – Transfer the mixture to a heatproof container, cover with wax paper pressed against the surface (to prevent a skin from forming), and let it cool completely to room temperature.
- Whip the Butter – Once the base has cooled, beat butter in a large mixing bowl until light and fluffy.
- Combine & Whip – Slowly add the cooled base mixture, one spoonful at a time, beating well after each addition. Once fully incorporated, mix in the vanilla extract.
- Chill Before Use – Place the filling in the fridge for 10-20 minutes to firm up slightly before assembling the cake.
Step 3: Make the Ganache Frosting
This silky chocolate ganache will be the finishing touch that makes this Ding Dong Cake truly irresistible!
- Heat the Cream – In a microwave-safe bowl, heat the heavy whipping cream for 35 seconds in the microwave.
- Melt the Chocolate – Add the chopped semi-sweet chocolate to the warm cream and let it sit for a minute before whisking.
- Stir Until Smooth – Continue stirring until the mixture is smooth and glossy. If needed, microwave for another 20-25 seconds to fully melt the chocolate.
- Let it Cool Slightly – Allow the ganache to cool to a spreadable consistency before using it to frost the cake.
Step 4: Assemble the Ding Dong Cake
Now that all the components are ready, it’s time to bring them together for the ultimate chocolate treat!
- Level the Cakes (If Needed) – If your cake layers have domed tops, use a cake leveler or serrated knife to gently trim them. This will ensure even layers and a stable cake.
- Fill the Cake – Place one cake layer on a serving plate. Spread the fluffy vanilla filling evenly across the top, making sure to go all the way to the edges.
- Add the Second Layer – Carefully place the second cake layer on top, pressing lightly to secure it. Use a spatula to smooth out any filling that may have squeezed out the sides.
- Chill the Cake – For the best results, place the assembled cake in the freezer for 10-15 minutes before adding the ganache. This helps the filling set and prevents the layers from shifting.
- Frost with Ganache – Pour the slightly cooled chocolate ganache over the top of the cake, letting it drip down the sides. Use an offset spatula to spread it evenly over the top and around the edges.
- Set the Ganache – Refrigerate the cake for at least 15 minutes to allow the ganache to firm up.
- Slice & Enjoy! – Once set, slice into thick pieces and enjoy every chocolatey, creamy bite!
Tips for the Best Ding Dong Cake
- Use Room Temperature Ingredients – This helps everything mix evenly, resulting in a smoother cake and filling.
- Don’t Skip the Coffee – It enhances the chocolate flavor without making the cake taste like coffee.
- Chill Before Frosting – Cooling the cake before adding ganache ensures a smooth and clean finish.
- Use High-Quality Chocolate – Since ganache is a key part of the cake, using good-quality chocolate makes a big difference!
FAQs & Troubleshooting
Can I Make This Cake Ahead of Time?
Yes! You can bake the cake layers a day in advance and store them tightly wrapped at room temperature. The filling and ganache can also be made ahead and stored in the refrigerator—just whip the filling again before using.
How Do I Store Leftover Cake?
- At Room Temperature: If serving within 2-3 days, keep the cake covered at room temperature.
- In the Refrigerator: Store in an airtight container for up to 5 days. Let it come to room temperature before serving.
- In the Freezer: Wrap individual slices in plastic wrap and freeze for up to 3 months. Thaw overnight in the fridge before enjoying.
Why Is My Cake Dry?
Dry cake is usually caused by overbaking or measuring flour incorrectly. Make sure to spoon and level your flour instead of scooping directly from the bag. Also, check your oven temperature with an oven thermometer to ensure accuracy.
Can I Make This Recipe as Cupcakes?
Yes! Simply divide the batter into lined muffin tins, filling each about ¾ full. Bake at 350°F (175°C) for 18-20 minutes, then follow the same steps for filling and frosting.
How to Decorate Your Ding Dong Cake
Want to make your cake extra special? Here are some fun decorating ideas:
Drizzle with extra chocolate ganache for a more dramatic look.
Top with chocolate shavings or curls for added texture.
Dust with powdered sugar for a simple but elegant finish.
Pipe decorative frosting swirls around the edges for a bakery-style touch.
Personalize with sprinkles to match birthdays or special occasions.
Final Thoughts
This homemade Ding Dong Cake is everything you love about the classic treat—just bigger, richer, and even more delicious! With its ultra-moist chocolate cake, fluffy vanilla filling, and smooth ganache frosting, it’s guaranteed to be a crowd-pleaser.
Whether you’re baking it for a birthday, holiday, or just because—you can’t go wrong with this indulgent chocolate dessert. Once you try it, you’ll never look at store-bought snack cakes the same way again!
Now, it’s time to grab a fork and enjoy every bite. Happy baking!