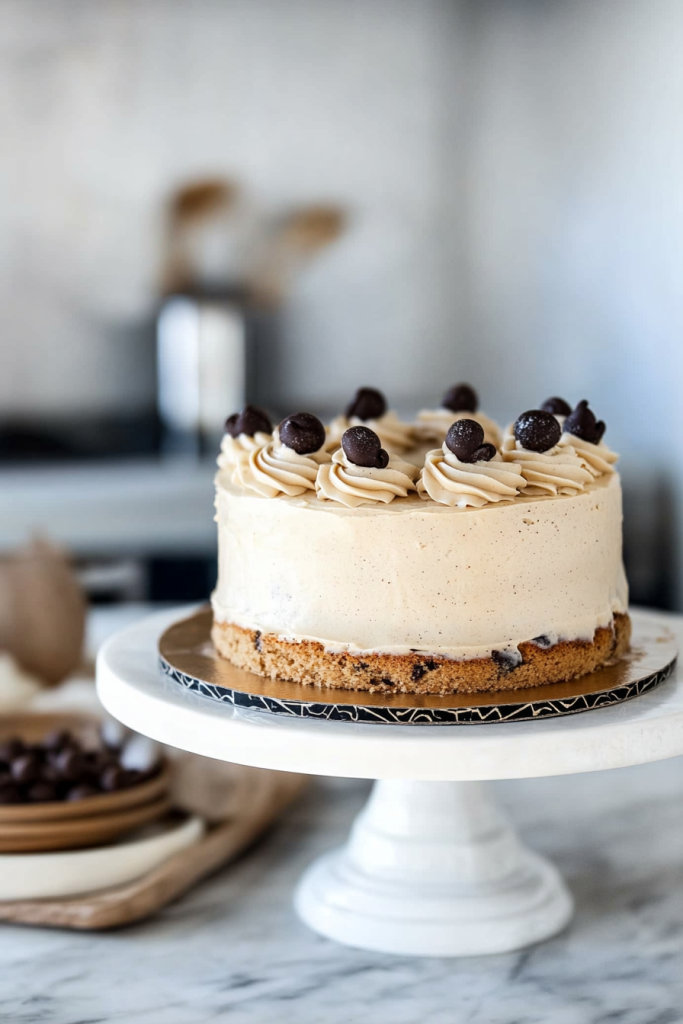
If you’re a coffee lover like me, then this Espresso Chocolate Chip Cake is about to become your new favorite dessert! Imagine a rich, moist cake infused with bold espresso flavor, perfectly balanced with pockets of melty chocolate chips. And to top it off? A silky-smooth coffee buttercream frosting that ties everything together beautifully. It’s the ultimate treat for coffee and chocolate enthusiasts alike!
Whether you’re celebrating a special occasion or just need a little indulgence, this cake is guaranteed to impress. The best part? It’s easy to make and tastes just as incredible as it looks!
About the Recipe
When I first set out to create this cake, I wanted something that combined my two great loves—coffee and chocolate. I envisioned a cake that was light yet rich, sweet but not overpowering, and most importantly, packed with deep espresso flavor.
After several trials (and a whole lot of taste-testing!), I finally nailed the perfect balance. The cake itself is moist and fluffy, thanks to the combination of sour cream and whole milk, while strong brewed coffee and espresso powder bring out an intense coffee aroma in every bite. And let’s not forget the mini chocolate chips—they add little bursts of sweetness that contrast beautifully with the bold espresso notes.
But the real star? That coffee buttercream! It’s whipped to perfection, making it airy, creamy, and just the right amount of sweet. A little extra espresso powder in the frosting really elevates the coffee flavor, making every slice an absolute dream.
This cake is perfect for birthdays, celebrations, or even just an afternoon pick-me-up. Trust me, it’s worth every bite!
Why You’ll Love This Espresso Chocolate Chip Cake
- Rich coffee flavor: If you love espresso, this cake is for you!
- Moist and fluffy texture: No dry cakes here—this one is tender, soft, and absolutely delicious.
- Perfect balance of sweetness: The chocolate chips add a touch of sweetness that complements the deep coffee notes.
- Incredible coffee buttercream: Light, smooth, and packed with flavor!
- Ideal for any occasion: Whether it’s a birthday or just a coffee date, this cake is always a hit.
Equipment Needed
Before we dive into the recipe, let’s make sure we have all the necessary tools to create this delicious Espresso Chocolate Chip Cake. Having everything prepped and ready makes the process smoother and more enjoyable!
Baking Tools You’ll Need:
✔ Mixing Bowls – For combining dry and wet ingredients separately.
✔ Whisk – To evenly mix the dry ingredients.
✔ Stand Mixer or Hand Mixer – Essential for creaming the butter and sugar to perfection.
✔ 8-Inch Cake Pans (3) – This recipe makes a beautiful three-layer cake, so you’ll need three pans.
✔ Parchment Paper – Helps prevent sticking and makes cake removal a breeze.
✔ Cooling Rack – Cooled cakes are easier to frost and decorate.
✔ Offset Spatula – The best tool for spreading that silky-smooth buttercream.
✔ Bench Scraper (Optional) – For achieving a professional-looking, smooth frosting finish.
Ingredients for the Cake
Now, let’s talk about the star ingredients that make this cake so incredible!
For the Espresso Chocolate Chip Cake:
- 2 and 2/3 cups (315g) cake flour – Gives the cake a soft, tender crumb.
- 2 teaspoons baking powder – Helps the cake rise beautifully.
- 1/2 teaspoon baking soda – Works alongside the baking powder for the perfect lift.
- 1 teaspoon salt – Enhances the flavors and balances the sweetness.
- 3/4 cup (12 Tbsp; 170g) unsalted butter, softened – Adds richness and moisture.
- 5 teaspoons espresso powder – The key ingredient for bold coffee flavor!
- 1 and 3/4 cups (350g) granulated sugar – Sweetens the cake just right.
- 4 large egg whites, room temperature – Keeps the cake light and airy.
- 1/2 cup (120g) sour cream, room temperature – Ensures a moist, tender crumb.
- 2 teaspoons pure vanilla extract – Enhances the overall flavor.
- 2/3 cup (160ml) whole milk, room temperature – Adds moisture and richness.
- 1/3 cup (80ml) brewed strong black coffee, room temperature – Intensifies the espresso flavor.
- 1 and 1/4 cups (225g) mini chocolate chips – Little pockets of chocolate goodness in every bite!
Ingredients for the Coffee Buttercream
No espresso cake is complete without a luscious coffee buttercream to tie it all together! This frosting is light, creamy, and bursting with coffee flavor.
For the Coffee Buttercream:
- 1 and 1/4 cups (282g) unsalted butter, softened – Creates a silky, creamy texture.
- 2 and 1/2 teaspoons espresso powder – Adds a rich coffee taste.
- 5 cups (560g) sifted confectioners’ sugar – Ensures a smooth, lump-free buttercream.
- 1/3 cup (80ml) heavy cream or whole milk – Gives the frosting the perfect consistency.
- 2 teaspoons pure vanilla extract – Complements the coffee flavor beautifully.
- 1/8 teaspoon salt – Balances the sweetness.
- Optional: Chocolate-covered espresso beans for garnish – A fun finishing touch!
How to Make Espresso Chocolate Chip Cake
Now that we have everything prepped, let’s dive into making this rich and flavorful Espresso Chocolate Chip Cake. The process is straightforward, and I’ll walk you through each step to ensure your cake turns out moist, fluffy, and absolutely delicious!
Step 1: Prepare the Cake Pans and Oven
- Preheat your oven to 350°F (177°C).
- Grease three 8-inch cake pans, line them with parchment paper, and then grease the parchment paper as well. This ensures your cakes release effortlessly after baking.
Step 2: Mix the Dry Ingredients
- In a medium bowl, whisk together the cake flour, baking powder, baking soda, and salt.
- Set this mixture aside for later.
Why does this matter? Sifting and whisking these ingredients together prevents lumps and ensures even distribution throughout the batter.
Step 3: Cream the Butter, Sugar & Espresso Powder
- In a large mixing bowl (or using a stand mixer), beat together softened butter, espresso powder, and granulated sugar on medium-high speed for about 2 minutes, until the mixture is light and fluffy.
- Scrape down the sides of the bowl with a spatula to ensure everything is well incorporated.
Why this step is crucial: Creaming the butter and sugar together creates air pockets, which help the cake rise and develop a light texture. The espresso powder also dissolves into the butter, intensifying the coffee flavor.
Step 4: Add the Wet Ingredients
- Beat in the egg whites one at a time, making sure each is fully mixed in before adding the next.
- Add the sour cream and vanilla extract, and continue beating until combined.
- The batter may look slightly curdled at this stage, but don’t worry—this is completely normal!
What makes egg whites special? They help keep the cake light and airy, which is essential when working with bold flavors like espresso and chocolate.
Step 5: Alternate Dry & Liquid Ingredients
- With the mixer on low speed, gradually add the dry ingredients in three parts, alternating with the milk and brewed coffee in two parts.
- Start and end with the dry ingredients (flour mixture).
- Mix until just combined—do not overmix! Overmixing can lead to a dense cake.
Step 6: Fold in the Chocolate Chips
- Gently fold in the mini chocolate chips using a spatula.
- Ensure they are evenly distributed throughout the batter.
Pro Tip: Tossing the chocolate chips in a little bit of flour before adding them to the batter can help prevent them from sinking to the bottom of the cake!
Step 7: Bake the Cake
- Divide the batter evenly between the three prepared cake pans.
- Smooth out the tops using a spatula.
- Bake for 25-28 minutes, or until a toothpick inserted in the center comes out clean or with a few moist crumbs.
- Let the cakes cool in the pans for 30 minutes, then carefully turn them out onto a cooling rack to cool completely.
Why cooling matters: A completely cooled cake is easier to frost and assemble. If the cakes are warm, the buttercream will melt and slide off!
At this point, your kitchen should be smelling heavenly with that rich coffee and chocolate aroma!
How to Make the Coffee Buttercream
Now that our Espresso Chocolate Chip Cake layers are cooling, it’s time to prepare the rich and creamy coffee buttercream. This frosting is smooth, silky, and packed with bold espresso flavor, making it the perfect complement to our cake!
Step 1: Cream the Butter & Espresso Powder
- In a large mixing bowl, beat softened unsalted butter and espresso powder together on medium speed for about 2 minutes, until the mixture is smooth and creamy.
Why add espresso powder early? This allows the butter to fully absorb the coffee flavor, giving the frosting a deep and balanced espresso taste.
Step 2: Add the Powdered Sugar
- Gradually add sifted confectioners’ sugar, one cup at a time, beating on low speed after each addition.
- Once all the sugar is incorporated, scrape down the sides of the bowl to ensure everything is well mixed.
Why sift the sugar? Sifting prevents lumps and results in an ultra-smooth buttercream texture.
Step 3: Add the Cream, Vanilla & Salt
- Pour in heavy cream (or whole milk), vanilla extract, and a pinch of salt.
- Beat the mixture on low speed until the ingredients start to combine.
- Then, increase the speed to high and whip for 2-3 minutes, until the frosting becomes light, fluffy, and spreadable.
Want a stronger coffee kick? Taste the frosting and mix in an extra 1/4 teaspoon of espresso powder if desired.
Step 4: Adjust the Consistency (If Needed)
- If the buttercream is too thick, add 1 tablespoon of cream or milk at a time until you reach your desired consistency.
- If it’s too thin, add a little more sifted powdered sugar until it thickens.
Your buttercream should be:
✔ Smooth and creamy
✔ Light and fluffy
✔ Perfectly spreadable
Assembling & Decorating the Espresso Chocolate Chip Cake
Now that our Espresso Chocolate Chip Cake layers are cooled and our coffee buttercream is whipped to perfection, it’s time to bring everything together! This is where the magic happens—layering, frosting, and decorating to make the cake look just as good as it tastes.
Step 1: Level the Cake Layers (If Needed)
- If the cakes have slightly domed tops, use a large serrated knife to carefully slice off a thin layer to create an even, flat surface.
- This helps ensure the layers stack neatly and the cake remains stable and balanced.
Pro Tip: Save the cake scraps! Crumble them over ice cream or snack on them while you decorate.
Step 2: Stack & Fill the Cake Layers
- Place the first cake layer onto a cake stand, cake turntable, or serving plate.
- Spread about ¾ cup of coffee buttercream evenly over the top using an offset spatula.
- Repeat this process with the second cake layer—stack it on top and frost with another ¾ cup of buttercream.
- Place the third cake layer on top.
Want extra flavor? Lightly brush each cake layer with brewed espresso before frosting to enhance the coffee taste!
Step 3: Frost the Cake
- Using an offset spatula, spread a thin crumb coat (a light layer of frosting) over the entire cake.
- This helps trap any loose crumbs and creates a smooth base for the final layer of frosting.
- Refrigerate the cake for 10-15 minutes to set the crumb coat.
- After chilling, apply the final coat of frosting, smoothing it out with an offset spatula or bench scraper for a clean, polished look.
Step 4: Decorate & Garnish
- Pipe decorative swirls of buttercream around the edges using a piping bag with a star tip.
- Sprinkle mini chocolate chips on top for extra chocolatey goodness.
- Garnish with chocolate-covered espresso beans for a beautiful finishing touch.
- (Optional) Lightly dust the cake with espresso powder for a café-inspired look.
Get creative! You can drizzle chocolate ganache over the top, add shaved chocolate curls, or even dust with cocoa powder for a more dramatic effect.
How to Store the Cake
- At Room Temperature: Store the cake in an airtight container for up to 2 days.
- In the Refrigerator: Keep it covered for up to 5 days—just let it sit at room temperature for 30 minutes before serving.
- In the Freezer: Freeze individual slices or the whole cake (wrapped well) for up to 3 months. Thaw in the fridge overnight before serving.
Final Thoughts
This Espresso Chocolate Chip Cake is the ultimate dessert for coffee lovers! Every bite is a perfect balance of bold espresso, rich chocolate, and silky coffee buttercream. Whether you’re baking for a special occasion or simply treating yourself, this cake is guaranteed to impress.
Ready to bake? Grab your ingredients and give it a try—I promise, it’s worth it! And if you do, let me know how it turns out. Happy baking!