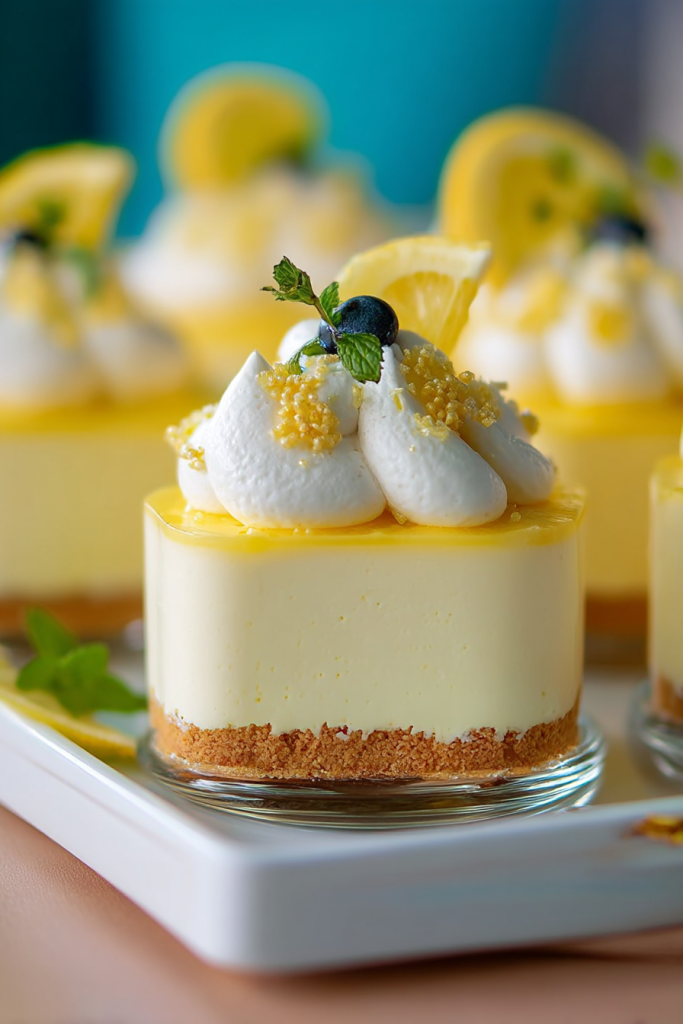
Light, airy, and bursting with citrusy goodness, this Lemon Cheesecake Mousse is the perfect dessert for any occasion! Creamy layers of tangy lemon-infused cheesecake mousse sit atop a buttery graham cracker crust, creating a heavenly combination that’s impossible to resist. Each spoonful delivers the perfect balance of sweet and tart flavors with a texture that’s incredibly smooth and velvety. Best of all, this elegant dessert requires no baking and comes together in just minutes! Whether you’re hosting a dinner party, celebrating a special occasion, or simply craving something sweet and refreshing, this Lemon Cheesecake Mousse is guaranteed to impress everyone who tries it!
About The Recipe
There’s something magical about the combination of lemon and cheesecake that just screams “perfect dessert” to me. When I was developing this recipe, I wanted to create something that captured all the decadence of a traditional cheesecake but with a lighter, more airy texture that would make it perfect for warmer months.
This mousse is no ordinary lemon dessert, though. It’s the perfect balance of rich and light, tangy and sweet. The silky smooth texture practically melts in your mouth while the bright lemon flavor wakes up your taste buds in the most delightful way.
After numerous test batches (which my family happily volunteered to taste-test!), I finally perfected what I believe to be the ultimate lemon cheesecake mousse. The secret lies in the perfect ratio of cream cheese to whipped cream, along with a generous helping of lemon curd that takes the flavor to the next level.
The best part? This dessert can be made ahead of time, making it perfect for entertaining. Just prepare it the day before, refrigerate, and you’ll have an impressive dessert ready to go whenever you need it!
Reasons You Will Love This Lemon Cheesecake Mousse
- Incredibly creamy texture with the perfect balance of sweet and tangy flavors
- No baking required – perfect for hot summer days!
- Can be prepared in individual servings for an elegant presentation
- Make-ahead friendly – perfect for entertaining
- Uses both fresh lemon juice and lemon curd for an intense citrus flavor
- Simple ingredients that create a show-stopping dessert
- Perfect light ending to any meal
Equipment Needed
- Mixing Bowls (small, medium, and large)
- Electric Hand Mixer or Stand Mixer
- Measuring Cups and Spoons
- Microwave-Safe Bowl
- Whisk
- Rubber Spatula
- Individual Dessert Cups or Glasses
- Piping Bag with Tip (optional, for elegant presentation)
- Zester (for lemon zest garnish)
Ingredients
For The Crust:
- 3/4 cup graham cracker crumbs (about 6 full sheets)
- 2 tablespoons granulated sugar
- 3 tablespoons salted butter, melted Description:
- Graham Cracker Crumbs – The perfect base for our lemon mousse, providing a sweet and slightly nutty flavor that pairs beautifully with the tangy lemon.
- Granulated Sugar – Just enough to sweeten the crust and help it hold together.
- Salted Butter – Binds the crumbs together while adding a rich flavor and slight saltiness that balances the sweet-tart mousse.
For The Mousse:
- 2 1/2 tablespoons fresh lemon juice
- 1 1/2 tablespoons water
- 1 1/2 teaspoons unflavored gelatin powder
- 1 1/2 cups heavy cream
- 1 cup powdered sugar, divided
- 12 ounces cream cheese, softened to room temperature
- 1 (10 ounce) jar lemon curd
- Yellow food coloring (optional)
- Zest of 1 lemon Description:
- Fresh Lemon Juice – The star of the show! Fresh is absolutely essential here for the brightest, most authentic flavor.
- Unflavored Gelatin – This magical ingredient gives our mousse its stability and that perfect texture that holds its shape.
- Heavy Cream – Whipped to perfection, this creates the light and airy texture that makes mousse so special.
- Powdered Sugar – Sweetens our mousse while dissolving perfectly for a smooth texture.
- Cream Cheese – The backbone of our cheesecake flavor. Make sure it’s fully softened for the smoothest results!
- Lemon Curd – This ingredient takes our mousse to the next level with intense lemony goodness in every bite.
- Yellow Food Coloring – Completely optional, but adds a lovely sunny hue to match the bright flavor.
- Lemon Zest – For an extra pop of fresh lemon flavor and beautiful flecks throughout the mousse.
For Garnish (Optional):
- Sweetened whipped cream
- Fresh berries (blueberries work especially well)
- Lemon slices or wedges
- Fresh mint leaves
- Additional lemon zest

How To Make The Perfect Lemon Cheesecake Mousse
Step 1: Prepare the Crust
In a mixing bowl, whisk together graham cracker crumbs and sugar until well combined. Pour in the melted butter and stir until all crumbs are evenly moistened. The mixture should resemble wet sand and hold together when pressed. Divide this mixture among 8-10 dessert cups or glasses and gently press into an even layer at the bottom of each. Set aside while you prepare the mousse.
Step 2: Bloom the Gelatin
Pour the fresh lemon juice and water into a small microwave-safe bowl. Sprinkle the gelatin powder evenly over the liquid’s surface. This is called “blooming” and is a crucial step – don’t stir yet! Let this mixture rest for 5 minutes, during which time the gelatin will absorb the liquid and swell. This ensures your mousse will set properly with no grainy texture.
Step 3: Whip the Cream
While the gelatin is blooming, pour the heavy cream into a medium mixing bowl. Using an electric mixer, whip the cream until soft peaks form – this means when you lift the beaters, the cream forms gentle peaks that slightly curl at the tips. Add 1/3 cup of the powdered sugar and a few drops of yellow food coloring if desired. Continue whipping until stiff (but not lumpy) peaks form. The cream should stand up straight when you lift the beaters. Set this aside – no need to clean your beaters yet!
Step 4: Prepare the Cheesecake Base
In a separate large mixing bowl, whip the softened cream cheese until smooth and fluffy, about 2 minutes. You want to ensure there are absolutely no lumps at this stage. Add the lemon curd, remaining 2/3 cup powdered sugar, and lemon zest. Mix until completely incorporated and the mixture is silky smooth.
Step 5: Activate the Gelatin
Now, return to your bloomed gelatin mixture. Heat it in the microwave on high power for 30 seconds. Whisk vigorously for 1 minute to completely dissolve the gelatin – it should be entirely clear with no visible granules. Allow this mixture to cool for exactly 3 minutes (set a timer!). This cooling period is critical – too hot and it could affect the cream cheese; too cool and it might start to set and create lumps.
Step 6: Combine Everything
While mixing the cream cheese mixture with your electric mixer on low speed, slowly pour in the dissolved gelatin mixture in a thin stream. Blend until thoroughly combined and smooth. Now comes the folding technique: gently transfer about 1/3 of your whipped cream mixture into the cream cheese mixture. Using a rubber spatula, carefully fold it in using a cutting motion down the center and scooping around the sides. This lightens the base before adding the remaining whipped cream. Once incorporated, add the remaining whipped cream and fold gently until just combined. Be careful not to overmix and deflate all the air you’ve incorporated!
Step 7: Assemble and Chill
Spoon or pipe the finished mousse into your prepared dessert cups, directly on top of the graham cracker layers. If you’re piping, use a large star tip for a beautiful presentation. Fill each cup almost to the top, leaving just a little room for garnishes later. Cover each cup with plastic wrap (being careful not to let it touch the surface of the mousse) and refrigerate for at least 2 hours, or up to 24 hours if preparing ahead.
Tips for Success
- Room Temperature Ingredients: Make sure your cream cheese is completely at room temperature before beginning. Cold cream cheese will result in a lumpy mousse, no matter how much you mix.
- Fresh Lemon Juice Only: For the brightest, most vibrant flavor, always use freshly squeezed lemon juice instead of bottled. The difference is truly remarkable in this recipe!
- Watch Your Gelatin Timing: The 3-minute cooling period for the dissolved gelatin is critical. If you let it cool too long, it will begin to set and create lumps in your mousse.
- Gentle Folding Technique: When incorporating the whipped cream into the cream cheese mixture, use a gentle folding motion rather than stirring to maintain as much air as possible in the mousse.
- Chill Thoroughly: Don’t rush the chilling process. A minimum of 2 hours is needed for the mousse to set properly and develop the best texture and flavor.
- Garnish Just Before Serving: Add any whipped cream, fresh berries, or lemon slices right before serving to maintain their freshness and prevent bleeding into the mousse.
Variations to Try
Want to put your own spin on this delicious dessert? Here are some amazing variations to try:
- Lime Cheesecake Mousse: Substitute lime juice and lime curd for a refreshing twist.
- Berry Lemon Mousse: Fold in 1/2 cup of fresh blueberries or raspberries into the mousse before chilling.
- Layered Lemon Mousse Parfait: Create beautiful layers by alternating the mousse with layers of lemon curd and graham cracker crumbs.
- Lemon Meringue Mousse Cups: Top the chilled mousse with a dollop of meringue and briefly torch for a lemon meringue pie-inspired dessert.
- Gingersnap Crust: Replace the graham crackers with crushed gingersnap cookies for a spicy-sweet complement to the tangy lemon.

Frequently Asked Questions
Can I make this recipe ahead of time? Absolutely! This is one of my favorite make-ahead desserts. You can prepare it up to 24 hours in advance and keep it refrigerated until ready to serve. Just add any fresh garnishes right before serving.
What can I substitute for lemon curd if I can’t find it? If you can’t find store-bought lemon curd, you can easily make your own! Simply whisk together 3 egg yolks, 1/3 cup sugar, zest and juice of 2 lemons, and 3 tablespoons butter in a saucepan over medium heat until thickened, about 5-7 minutes. Cool completely before using.
Can I use low-fat cream cheese or whipped topping instead? For the best texture and flavor, I strongly recommend using full-fat cream cheese and real heavy cream. Low-fat substitutes won’t set as firmly and may affect both the texture and taste of the final dessert.
My mousse didn’t set properly. What went wrong? The most common reasons for mousse not setting properly are either not allowing the gelatin to bloom fully before heating it, or not chilling the mousse long enough. Make sure to follow the exact timing in the recipe and allow at least 2 hours of chilling time.
Can I freeze this lemon cheesecake mousse? While you can freeze it, freezing may slightly alter the texture. If you do freeze it, thaw overnight in the refrigerator before serving for the best results.
How to Store
These beautiful lemon cheesecake mousse cups can be stored in the refrigerator, covered with plastic wrap, for up to 3 days. The flavor actually improves after the first day as the lemon flavor deepens and mellows!
If you want to prepare elements ahead of time, you can make the graham cracker crust up to 2 days in advance and keep it in the refrigerator. The completed mousse is best consumed within 3 days for optimal flavor and texture.
For the freshest presentation, always add any garnishes like whipped cream, fresh berries, or mint leaves just before serving.
I hope you enjoy this refreshing and elegant Lemon Cheesecake Mousse as much as my family does. It’s the perfect way to end a meal with a bright burst of citrus flavor and creamy, dreamy texture!