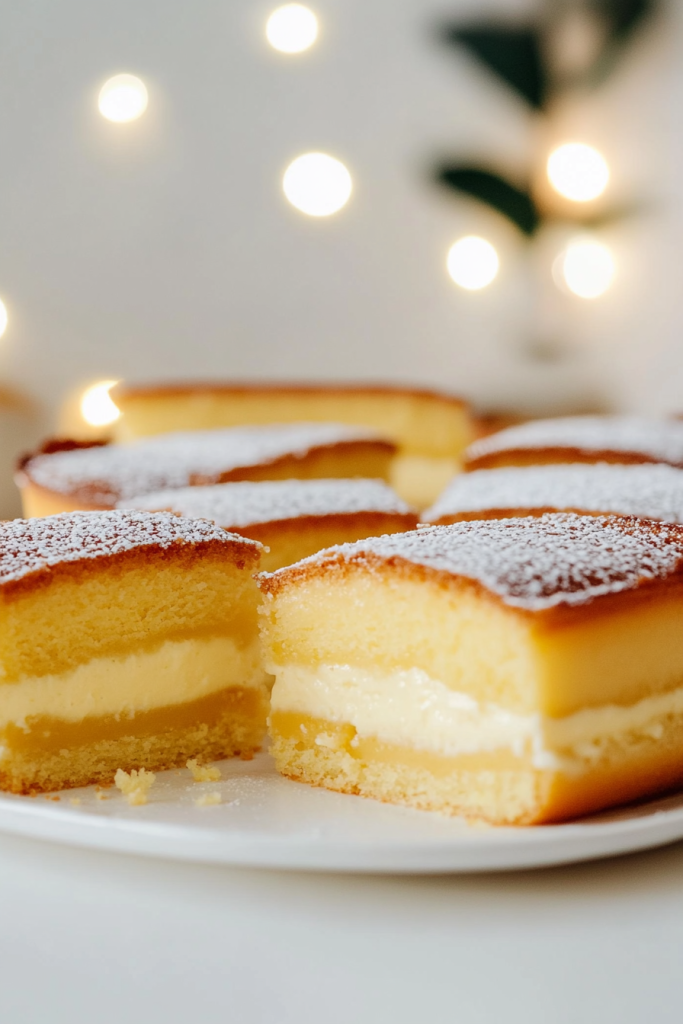
If you’ve ever been curious about the wonders of Magic Custard Cake, then you’re in for a real treat! This cake is simply magical because, while baking, it transforms into three distinct layers: a rich, creamy custard layer at the bottom, a soft and fluffy cake layer at the top, and a smooth, velvety texture in the middle. It’s as if magic happens in your oven, and the best part? It’s all made with simple ingredients that you probably already have in your kitchen!
About The Recipe
Magic Custard Cake is an indulgent dessert that will leave your taste buds enchanted. My first encounter with this cake was a complete revelation. When I saw the batter, I thought there was no way this could work, but as it baked, it miraculously separated into three layers, each one more delicious than the last.
When creating this recipe, I wanted to find a balance of rich flavors without it being too heavy. You know how sometimes custard-based desserts can feel a bit overwhelming? Well, this one isn’t. The layers are just the right amount of creamy, light, and delicate. The vanilla flavor shines through, and the texture is like a dream.
What makes this recipe even better is how easy it is to make! There’s no need for complicated steps or fancy equipment. You’ll be able to whip up this cake in no time, and it will impress anyone you serve it to. Whether you’re hosting a dinner party, celebrating a special occasion, or simply craving something sweet, Magic Custard Cake is the perfect solution.
Why You’ll Love This Magic Custard Cake
- Three magical layers – It’s like the cake does the work for you, separating into a soft cake layer, a custardy middle, and a luscious bottom layer.
- Simple ingredients – Everything you need is basic and easily accessible in your pantry.
- No special equipment – You don’t need any fancy mixers or gadgets. Just a few bowls, a whisk, and your oven!
- Impressive and unique – It’s a showstopper that looks way more complex than it actually is.
- Versatile – You can customize it with different flavorings like almond or orange zest, or serve it with a dusting of powdered sugar or fresh berries for an extra touch.
Equipment Needed
You don’t need any special tools for this recipe – just a few essentials to make it as easy as possible!
- Mixing Bowls – For combining the ingredients and ensuring everything is well-incorporated.
- Whisk – A simple whisk is perfect for mixing up the batter and egg whites.
- Electric Mixer (Optional) – If you want to save some arm strength, an electric mixer is helpful for beating the egg whites to stiff peaks.
- 20cm Square Cake Tin – A square tin works best for this recipe. The shape ensures the batter sets up evenly and gives that signature magic effect.
- Parchment Paper – To prevent the cake from sticking and to make it easier to remove once it’s done baking.
Ingredients
For the Cake:
- 4 large eggs (room temperature)
- ¾ cup caster sugar (or superfine sugar)
- 125 grams butter (melted)
- 1 teaspoon vanilla extract
- ¾ cup plain flour (sifted)
- 2 cups milk (lukewarm, about 500 ml)
- ¼ cup icing sugar (for decoration)
Description:
- Eggs – Eggs are the key to the cake’s magic, helping it separate into three distinct layers while giving the cake its structure and texture.
- Caster Sugar – This is the sweetener for the cake, contributing to the soft, fluffy texture.
- Butter – Melted butter adds richness and flavor to the cake. It helps create the creamy custard layer in the center.
- Vanilla Extract – This adds a lovely aroma and flavor that complements the custard perfectly.
- Plain Flour – Helps bind the ingredients together and forms the cake layer at the top.
- Milk – The milk is the base of the custard and helps achieve the rich, velvety texture in the middle layer.
- Icing Sugar – For dusting the cake when it’s done. It’s a simple touch that makes the cake look even more inviting.
How to Make Magic Custard Cake
Step 1: Prepare the Ingredients
- Preheat the oven to 170°C (fan-forced). While the oven is warming up, line a 20cm square cake tin with baking paper. Make sure the paper hangs over the edges of the tin, which will make it easier to lift the cake out once it’s done.
Step 2: Separate the Eggs and Beat the Egg Whites
- Separate the eggs carefully, placing the egg whites in a clean, dry bowl (this is really important for them to whip properly).
- Using an electric mixer, beat the egg whites until stiff peaks form. Set aside.
Step 3: Mix the Egg Yolks and Sugar
- In a large bowl, combine the egg yolks and caster sugar. Using the electric mixer again, beat the mixture until it becomes light and frothy. This helps to create a nice, smooth texture for the cake.
Step 4: Add Wet Ingredients
- With the mixer still running on a low speed, gradually add the melted butter and vanilla extract. Once incorporated, add the sifted flour one spoonful at a time, mixing as you go. This ensures that the flour is evenly distributed, preventing lumps.
- Slowly add the lukewarm milk and continue to beat the mixture on a low-medium speed until everything is well combined. The batter may look a little lumpy at this stage, but don’t worry – that’s completely normal!
Step 5: Fold in the Egg Whites
- Now, fold the beaten egg whites into the batter gently. This step is crucial as it helps create the magical layers in the cake. Be gentle to preserve the air in the egg whites for a fluffy texture.
Step 6: Bake the Cake
- Pour the batter into the prepared cake tin. It will be quite runny, but that’s exactly what you want. The batter will naturally separate into layers as it bakes.
- Bake for 35 minutes, or until the top has turned golden brown. The cake will form a golden crust, but the center will remain custard-like. A slight wobble in the center is a sign that it’s done.
Step 7: Cool and Serve
- Let the cake cool in the tin for a bit. After about 10 minutes, carefully remove it from the tin and let it cool completely on a wire rack.
- Once cooled, dust with icing sugar for a simple, elegant finish.
Tips and Troubleshooting
1. Why does the batter look runny? It’s totally normal for the batter to look runny before baking. This is because the batter needs to be thin to allow the layers to form as it bakes. Don’t worry, it will thicken up during the baking process!
2. What if my cake doesn’t form layers? If the cake doesn’t separate into layers, it’s usually due to overmixing the batter or folding in the egg whites too vigorously. Make sure you fold in the egg whites gently to maintain air in the batter, which is key to forming the layers.
3. Can I use a different cake pan? You can! If you don’t have a 20cm square pan, any similar-sized pan will work. Just keep in mind that if you change the size of the pan, the baking time might need adjusting. Make sure to check the cake with a toothpick to ensure it’s done.
4. How do I store Magic Custard Cake? You can store this cake in the fridge, where it will stay fresh for up to 3 days. The cool temperature helps maintain the custard-like consistency of the center. Simply cover it with plastic wrap or store in an airtight container.
5. Can I freeze the cake? Yes! You can freeze slices of the Magic Custard Cake. Wrap them tightly in plastic wrap and then foil to prevent freezer burn. You can store them for up to 2 months. To serve, just thaw at room temperature for a few hours before enjoying.
Why You’ll Love This Magic Custard Cake
- Unique Texture: Magic Custard Cake is unlike any other cake you’ve tried. It’s got a golden, slightly crunchy top, followed by a smooth, custard-like center that melts in your mouth.
- Simple Ingredients: The best part about this cake is that it requires only a few simple ingredients that you likely already have at home.
- Versatile Dessert: Whether you’re hosting a dinner party or craving something sweet for the weekend, this cake is perfect for any occasion. You can also easily adapt it by adding flavoring or toppings, like fruit or a drizzle of chocolate.
Final Thoughts
This Magic Custard Cake is one of those desserts that seems a bit magical, turning a simple batter into something extraordinary. With its irresistible custard center and golden top, it’s a showstopper that will impress your guests without requiring hours of work in the kitchen.
The best part? It’s an easy dessert to whip up with just a few basic ingredients. Whether you’re an experienced baker or a beginner, this recipe will leave you with a dessert that feels like a professional creation, all while being simple and delicious.