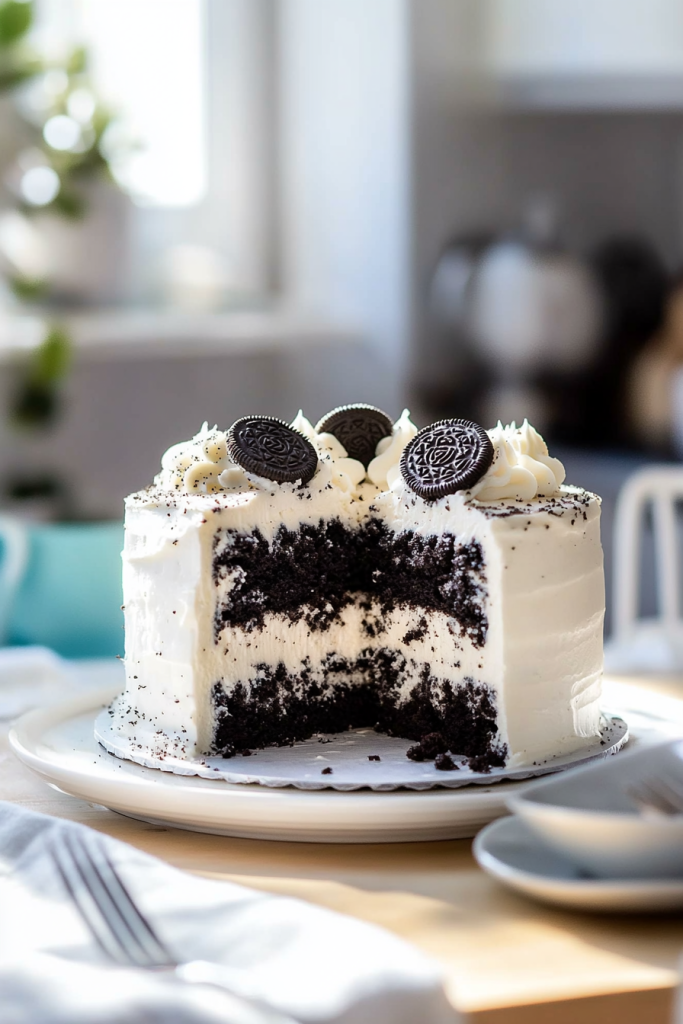
If you love cookies and cake equally, then let me introduce you to the ultimate dessert mashup: Oreo Cookies and Cream Cake. This rich, chocolatey layer cake is deeply indulgent, yet incredibly approachable. With soft, moist layers of dark chocolate cake, a fluffy cookies-and-cream filling, Oreo-flecked buttercream, and a glossy chocolate drip—it’s every cookies-and-cream lover’s dream come true.
This cake is show-stopping and surprisingly simple to make. Whether you’re celebrating a birthday, a holiday, or just surviving the week, this cake turns an ordinary day into something worth celebrating. And yes, it tastes even better than it looks.
About The Recipe
The inspiration for this cake? An Oreo milkshake. That cool, creamy, cookie-packed goodness is exactly what I wanted to bring to life in cake form. But instead of going with just crushed cookies in the frosting, I decided to go big—rich chocolate cake, a whipped Oreo cheesecake filling, a light and fluffy Oreo buttercream, and a dramatic ganache drip to top it all off.
Every bite is layered with intense flavor: the chocolate cake is tender and fudgy, the filling is airy but decadent, and the frosting? Loaded with real cookie crumbs for the perfect texture and nostalgia-packed taste.
This cake has quickly become a go-to in our kitchen—my family now asks for it on repeat, and friends always request it for their birthdays. It’s one of those cakes that looks like it came from a bakery but tastes even better because it’s homemade.
Reasons You Will Love This Cookies and Cream Cake
- Deep, rich chocolate flavor thanks to dark cocoa powder
- Moist layers that hold up beautifully to filling and frosting
- A light Oreo cheesecake-style filling for a surprising twist
- Cookies and cream buttercream made with real Oreos
- Dramatic chocolate ganache drip that looks and tastes amazing
- Perfect for birthdays, holidays, or cookie lovers of all ages
Equipment Needed
Before you begin, here’s everything I used to make this cake from start to finish:
- Mixing Bowls (medium and large)
- Stand Mixer with Paddle + Whisk Attachments
- 3 x 8-inch or 4 x 6-inch Round Cake Pans
- Parchment Paper
- Rubber Spatula
- Offset Spatula
- Fine Mesh Sifter or Strainer
- Microwave-Safe Bowl (for ganache)
- Cake Turntable (optional but helpful)
- Bench Scraper (for smooth frosting)
- Piping Bag (optional, for neat drip application)
Ingredients
For the Chocolate Cake Layers:
- 2 cups (240g) all-purpose flour
- 1¾ cups (350g) granulated sugar
- ¾ cup (88.5g) dark cocoa powder
- 2 teaspoons baking soda
- ¾ teaspoon baking powder
- 1 teaspoon salt
- 1 cup (240g) buttermilk, room temperature
- ½ cup (109g) vegetable oil
- 3 large eggs, room temperature
- 1 cup (236.6g) hot water
- 1 teaspoon vanilla extract
Ingredient Notes:
- Dark Cocoa Powder – Use a high-quality dark or Dutch-processed cocoa for that deep, intense flavor.
- Buttermilk – Adds tang and makes the crumb extra tender.
- Hot Water – Helps bloom the cocoa and intensifies the chocolate flavor.
For the Cookies and Cream Filling:
- ¾ cup (173g) heavy whipping cream
- 6 oz cream cheese, softened
- 2 cups (250g) powdered sugar, sifted
- 8 Oreo cookies, roughly chopped
Ingredient Notes:
- Whipped Cream – Gives the filling that light, mousse-like texture.
- Cream Cheese – Adds richness and balances the sweetness.
- Oreo Chunks – Fold them in right before using to keep the texture crispy!
For the Oreo Buttercream:
- 2 cups (452g) unsalted butter, slightly cold
- 6 cups (750g) powdered sugar, sifted
- 3 tablespoons (43g) heavy whipping cream
- 6 Oreo cookies, finely crushed
Ingredient Notes:
- Slightly Cold Butter – Helps the buttercream whip up to the perfect texture without being too soft.
- Crushed Oreos – Pulse in a food processor until very fine for the smoothest frosting.
For the Chocolate Ganache Drip:
- 1 cup (150g) semi-sweet or dark chocolate chips
- ¾ cup to 1 cup (173g–231g) heavy cream
- Black food gel (optional, for a deeper drip color)
How To Make the Perfect Oreo Cookies and Cream Cake
Step 1: Bake the Chocolate Cake Layers
Start by preheating your oven to 325°F (165°C). Spray the bottoms of three 8-inch or four 6-inch round cake pans with nonstick spray, line with parchment paper, then spray again. Set aside.
In a large mixing bowl, whisk together the flour, sugar, cocoa powder, baking soda, baking powder, and salt until fully combined.
In a separate bowl or large measuring cup, mix the eggs, buttermilk, hot water, oil, and vanilla extract. With your mixer on low speed, slowly pour the wet ingredients into the dry ingredients. Mix just until smooth and combined—about 30 seconds. Scrape the bowl and mix again for another 10-15 seconds.
Evenly divide the batter between your prepared pans. You should have about 16 ounces per 8-inch pan. Bake for 25–30 minutes, or until a toothpick inserted in the center comes out with just a few moist crumbs. Let the cakes cool in the pans for 10 minutes before turning them out onto wire racks. Wrap cooled layers in plastic wrap and chill for at least 1 hour before assembling.
Step 2: Make the Cookies and Cream Filling
In the bowl of your stand mixer fitted with the whisk attachment, whip the heavy cream on high speed until stiff peaks form. Transfer it to another bowl and set aside.
Switch to the paddle attachment, and beat the cream cheese until smooth. Gradually add the sifted powdered sugar and beat until fluffy and lump-free.
Gently fold in the whipped cream using a spatula until no streaks remain. Add the crushed Oreo chunks last and fold again until just combined. For best results, make this filling right before assembly to keep the cookies crisp.
Step 3: Whip Up the Oreo Buttercream
Using the paddle attachment, beat the butter on medium-high speed for about 2 minutes until creamy.
Turn the mixer to low and slowly add the sifted powdered sugar. Once incorporated, add the cream one tablespoon at a time. Scrape down the bowl, then beat on medium-high for 4–5 minutes, until light and fluffy.
Stir in the finely crushed Oreos, then beat briefly just until combined. Use a wooden spoon or spatula to stir by hand for 30 seconds to remove air bubbles.
Assemble the Oreo Cake Like a Pro
Step 1: Build the Layers
Start by placing one cake layer, top side up, in the center of your cake board or stand. Pipe a rim of Oreo buttercream around the edge—this creates a barrier to hold in the filling.
Spoon about 1 cup of the cookies and cream filling into the center and gently spread it to the edges. Repeat this process with the second cake layer.
Place your final cake layer on top, this time top side down to create a flat surface.
Step 2: Crumb Coat and Chill
Apply a thin layer of Oreo buttercream around the entire cake to catch any crumbs. This is your crumb coat. Chill the cake for about 10–15 minutes until the buttercream is firm to the touch.
Step 3: Final Frosting and Drip
After the crumb coat has set, frost the cake with the remaining buttercream, smoothing the sides and top with an offset spatula or bench scraper. Place the cake back in the fridge to chill for another 10 minutes before adding the ganache.
To make the ganache drip, microwave your heavy cream until just steaming (about 1 minute), then pour it over the chocolate chips. Let sit for 5 minutes, then stir until smooth and glossy. For an extra dramatic look, you can add a drop of black food gel to darken the ganache.
Let the ganache cool slightly before dripping it along the sides of the chilled cake using a spoon or piping bag.
Decorate the top with extra Oreo halves, cookie crumbs, or swirls of buttercream if you like. This cake is ready to wow.
FAQs and Troubleshooting
Can I make this cake in advance?
Absolutely! The cake layers can be made ahead and frozen for up to a week. Just thaw slightly before layering. You can also assemble the entire cake and refrigerate it overnight.
Why are my cake layers sinking or gummy in the center?
It’s usually a result of underbaking or opening the oven door too early. Make sure the cake is fully baked before removing from the oven—check with a toothpick in the center.
Can I skip the chocolate drip?
Of course! The ganache adds a wow factor, but the cake is still stunning without it.
How do I make the Oreo crumbs smooth for the frosting?
Use a food processor to pulse the Oreos until fine. Any large chunks can clog your piping tips or create a rough buttercream.
Decorating Ideas
- Top with whole or halved Oreos
- Pipe swirls of buttercream and add mini cookies
- Use chocolate curls or sprinkles for texture
- Drizzle extra ganache for a “lava flow” effect
How to Store
This cake is best stored covered in the fridge for up to 5 days. Let it sit at room temperature for 2–3 hours before serving so the buttercream softens up.
To freeze, wrap individual slices or the whole cake in plastic wrap and foil. Store in an airtight container for up to 2 months. Thaw in the fridge overnight, then bring to room temperature before enjoying.