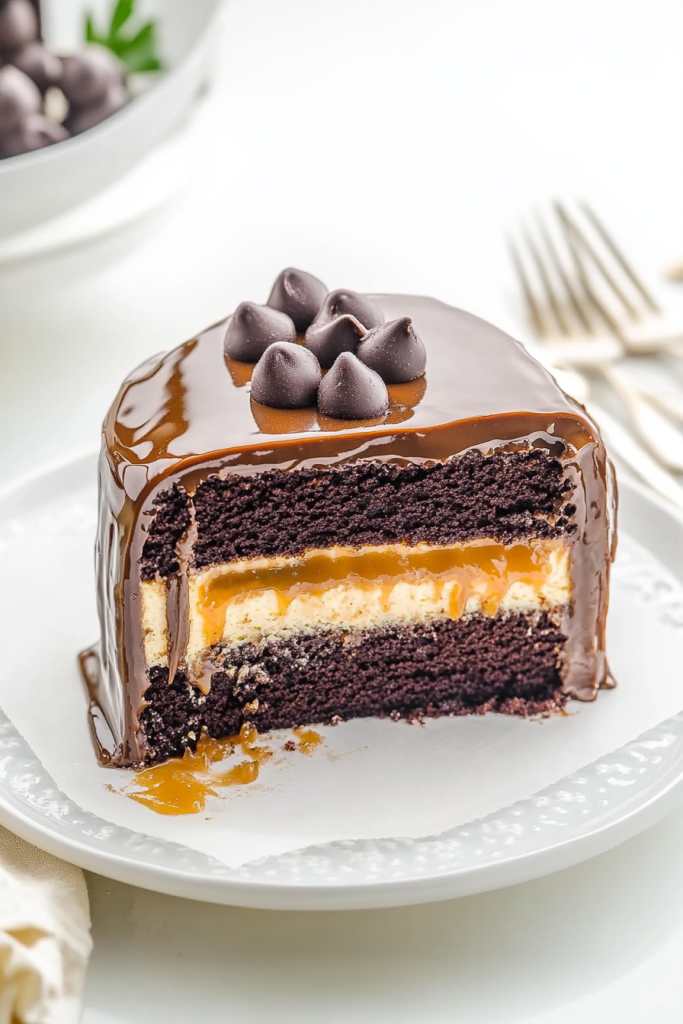
If you love the combination of rich chocolate, creamy caramel, and a touch of sea salt, then this Salted Caramel Chocolate Cake is for you! Imagine moist, fudgy chocolate cake layers, velvety salted caramel chocolate frosting, and a luscious drizzle of homemade caramel sauce. Every bite is the perfect balance of sweet and salty, making this cake a showstopper for birthdays, celebrations, or whenever you’re craving an indulgent dessert.
This cake is the ultimate treat for chocolate and caramel lovers. The deep cocoa flavor is intensified by a hint of coffee, while the salted caramel adds just the right amount of contrast. The frosting is smooth, creamy, and infused with caramel for an extra layer of decadence. Top it all off with flaky sea salt, and you have a cake that tastes as luxurious as it looks!
Why You’ll Love This Salted Caramel Chocolate Cake
- Rich & Moist – The cake layers are incredibly soft, thanks to the combination of sour cream, eggs, and hot water.
- Perfectly Balanced Flavors – The sweetness of chocolate and caramel is complemented by the slight saltiness, creating a well-rounded taste.
- Silky Caramel Chocolate Frosting – This frosting is buttery, chocolatey, and infused with homemade caramel sauce for an irresistible finish.
- Showstopper Appearance – The glossy caramel drizzle and sprinkle of sea salt make this cake visually stunning.
- Easy to Make in Advance – You can bake the cake layers ahead of time and assemble the cake when needed.
Equipment Needed
To ensure your cake turns out perfect, here’s what you’ll need:
- Three 9-inch round cake pans
- Mixing bowls (for dry and wet ingredients)
- Electric mixer (stand or handheld)
- Sifter (for cocoa powder and powdered sugar)
- Cooling racks (to cool cake layers evenly)
- Offset spatula (for smooth frosting application)
- Cake turntable (optional but helpful for frosting evenly)
Ingredients
For the Chocolate Cake:
- 2 cups granulated sugar
- 1 cup packed light brown sugar
- 2 ¾ cups all-purpose flour (spooned & leveled, not packed!)
- 1 ½ cups unsweetened cocoa powder (sifted)
- 3 teaspoons baking soda
- 1 ½ teaspoons baking powder
- 1 ¼ teaspoons salt
- 3 large eggs + 2 egg yolks (room temperature)
- 1 ½ cups full-fat sour cream
- ⅓ cup whole milk
- ¾ cup vegetable oil (or melted coconut oil)
- 2 tablespoons vanilla extract
- 1 ½ cups hot water
For the Salted Caramel Chocolate Frosting:
- 2 cups unsalted butter (very soft, at room temperature)
- 4 ½ cups powdered sugar (sifted)
- ¾ cup unsweetened cocoa powder (sifted)
- 1 teaspoon vanilla extract
- ½ teaspoon salt
- 3 tablespoons heavy cream (or more if needed)
- 2 tablespoons salted caramel sauce
For Garnish & Assembly:
- 1 ¼ cups salted caramel sauce
- Flaky sea salt (for sprinkling on top)
Step 1: Preparing the Chocolate Cake
A perfectly moist and rich chocolate cake starts with the right ingredients and technique. Follow these steps to create a base that is tender yet sturdy enough to hold layers of caramel and frosting.
1. Preheat & Prepare the Pans
Preheat your oven to 350°F (175°C). Grease three 9-inch round cake pans with nonstick spray. Line the bottoms with parchment paper and spray again to prevent sticking.
2. Mix the Dry Ingredients
In a large mixing bowl, whisk together:
- Granulated sugar, brown sugar, flour, cocoa powder, baking soda, baking powder, and salt.
Use a sifter to break up any clumps, ensuring an even, lump-free mixture.
3. Combine the Wet Ingredients
In a separate bowl, whisk together:
- Eggs, egg yolks, sour cream, whole milk, vegetable oil, and vanilla extract until smooth.
4. Bring the Batter Together
- Slowly add the wet ingredients to the dry ingredients, mixing on low speed until just combined.
- Pour in hot water while mixing on low. The batter will be thin—this is normal! The hot water enhances the cocoa’s depth, making the cake extra rich and flavorful.
5. Bake the Cake
- Divide the batter evenly among the prepared cake pans.
- Bake for 30 minutes or until a toothpick inserted in the center comes out with just a few moist crumbs.
- Let the cakes cool in the pans for 10 minutes, then carefully transfer them to a wire rack to cool completely.
Step 2: Making the Salted Caramel Chocolate Frosting
Now that our rich chocolate cake layers are cooling, it’s time to prepare the silkiest salted caramel chocolate frosting. This frosting is smooth, chocolatey, and perfectly balanced with the deep flavors of salted caramel. It spreads beautifully and pairs exceptionally well with the moist chocolate cake.
Tips for the Perfect Buttercream Frosting
- Use Soft Butter – The butter should be very soft but not melted. This ensures a smooth, fluffy texture.
- Sift the Dry Ingredients – Cocoa powder and powdered sugar should be sifted to prevent any lumps.
- Beat Until Fluffy – The key to ultra-creamy frosting is whipping it well for at least 3 minutes.
- Adjust the Consistency – If the frosting is too thick, add a splash of heavy cream. If it’s too thin, add more powdered sugar.
- Add Caramel at the Right Time – The salted caramel should be drizzled in after the frosting is fully mixed, ensuring even distribution.
How to Make Salted Caramel Chocolate Frosting
1. Beat the Butter Until Creamy
In the bowl of a stand mixer fitted with the paddle attachment (or using a hand mixer), beat 2 cups of unsalted butter on medium speed for about 3 minutes, until smooth and fluffy.
2. Add the Dry Ingredients
Turn the mixer off and sift in:
- 4 ½ cups powdered sugar
- ¾ cup unsweetened cocoa powder
Turn the mixer on the lowest speed and mix until the dry ingredients are fully incorporated into the butter. This prevents a powdery mess!
3. Add Vanilla, Salt, and Heavy Cream
Increase the speed to medium and add:
- 1 teaspoon vanilla extract
- ½ teaspoon salt
- 3 tablespoons heavy cream
Beat for 3 minutes until light and fluffy. If the frosting is too thick, add 1 more tablespoon of heavy cream.
4. Incorporate the Salted Caramel
Finally, drizzle in 2 tablespoons of salted caramel sauce and mix for 30 more seconds, just until combined. Do not overmix, or the frosting may become too loose.
Frosting Consistency Check
At this point, your frosting should be:
✔️ Smooth and creamy – Not too thick or too runny.
✔️ Spreadable – It should easily glide over the cake layers without tearing them.
✔️ Light and fluffy – Airy, but stable enough to hold its shape when piped.
If needed, adjust by adding more powdered sugar for thickness or a small splash of cream for softness.
Step 3: Assembling the Salted Caramel Chocolate Cake
Now that we have our rich chocolate cake layers and silky salted caramel chocolate frosting, it’s time to assemble this masterpiece! This step is crucial for achieving a well-balanced, visually stunning cake with perfectly even layers.
Tips for a Flawless Cake Assembly
- Ensure the Cake Layers are Completely Cool – Frosting warm cakes will cause the buttercream to melt and slide off.
- Trim the Cake Layers – If the cakes have domed tops, use a serrated knife to carefully level them for even stacking.
- Use a Cake Turntable (optional but recommended) – This helps achieve smooth frosting and even layers.
- Chill Between Layers – Refrigerating the cake after stacking the layers helps it stay sturdy and makes frosting easier.
How to Assemble the Cake
1. Prepare the Cake Layers
- Place the first completely cooled chocolate cake layer on a cake stand or serving plate.
- If necessary, trim the top using a serrated knife to create an even surface.
2. Add the First Layer of Frosting & Caramel
- Spread a thin layer of chocolate frosting evenly over the first cake layer using an offset spatula.
- Drizzle ½ cup of salted caramel sauce over the frosting and gently spread it to the edges.
3. Stack the Second Layer
- Place the second cake layer on top and repeat the process:
- Frost with a thin layer of chocolate frosting.
- Drizzle with another ½ cup of salted caramel sauce.
4. Add the Final Cake Layer
- Gently place the third and final cake layer on top.
- Lightly press down to secure all layers in place.
5. Apply a Crumb Coat (Optional but Recommended)
- Spread a thin layer of frosting over the entire cake to trap crumbs.
- Refrigerate for 30 minutes to set.
Final Frosting & Decoration
6. Frost the Entire Cake
- Using the remaining frosting, cover the top and sides of the cake.
- Smooth it out with an offset spatula for a clean, polished look.
7. Add the Salted Caramel Drizzle
- Warm ½ cup of salted caramel sauce slightly (if needed for drizzling consistency).
- Using a spoon, drizzle the caramel over the edges of the cake, allowing it to naturally drip down the sides.
8. Garnish with Sea Salt
- Sprinkle a pinch of flaky sea salt over the top for an extra pop of flavor and elegance.
Chill Before Serving
- For the best texture and flavor, refrigerate the cake for at least 1 hour before slicing.
- This helps set the caramel and allows the flavors to meld beautifully.
Step 4: FAQs & Troubleshooting
Even with a well-tested recipe, sometimes things don’t go as planned. Here are the most common questions and troubleshooting tips to ensure your Salted Caramel Chocolate Cake turns out perfect every time.
Frequently Asked Questions
1. Can I use store-bought caramel sauce instead of homemade?
Absolutely! While homemade caramel sauce provides a deeper flavor, you can use a high-quality store-bought salted caramel sauce if you’re short on time. Just ensure it’s thick enough to drizzle properly.
2. How do I prevent my cake from becoming dry?
A dry cake is often the result of overbaking or incorrect ingredient measurements. To prevent this:
- Check for doneness early – Every oven varies, so start testing at the 28-minute mark.
- Measure flour correctly – Always spoon and level the flour instead of scooping directly.
- Use room temperature ingredients – Cold ingredients don’t incorporate well, which affects texture.
3. My caramel is too thick/thin—how can I fix it?
- If your caramel is too thick, warm it slightly in the microwave for 5-10 seconds to loosen it before drizzling.
- If your caramel is too thin, let it cool longer, or stir in a little more cream until you reach the right consistency.
4. Can I make this cake in advance?
Yes! This cake is perfect for making ahead:
- Cake Layers: Bake and wrap in plastic wrap. Store at room temperature for 1 day or freeze for up to 2 months.
- Frosting: Store in an airtight container in the fridge for up to 1 week. Let it soften at room temperature before using.
- Assembled Cake: The fully frosted cake can be refrigerated for up to 3 days before serving.
5. Can I turn this recipe into cupcakes?
Yes! Simply:
- Line a muffin pan with cupcake liners.
- Fill each liner ¾ full with batter.
- Bake at 350°F (175°C) for 18-20 minutes or until a toothpick inserted in the center comes out clean.
- Top with frosting and a caramel drizzle for mini indulgent treats!
Troubleshooting Common Cake Problems
My cake didn’t rise properly. What went wrong?
- Check that your baking soda and baking powder are fresh and not expired.
- Avoid overmixing the batter—this can lead to a dense cake.
- Make sure your oven temperature is accurate by using an oven thermometer.
My frosting is too runny. How do I fix it?
- If your frosting is too soft, chill it in the fridge for 15-20 minutes before spreading.
- Add more powdered sugar (1 tablespoon at a time) until you reach the desired consistency.
Why is my cake too sweet?
- Salted caramel is naturally sweet, so adding flaky sea salt on top helps balance the flavors.
- Using dark cocoa powder instead of regular cocoa can also tone down the sweetness.
Step 5: How to Store & Final Tips
Now that you’ve made and assembled your Salted Caramel Chocolate Cake, you might be wondering how to store leftovers or make the most of your masterpiece. Whether you’re serving it fresh or saving it for later, here’s everything you need to know.
How to Store Salted Caramel Chocolate Cake
1. Storing at Room Temperature (Best for short-term storage)
- If you plan to eat the cake within 1-2 days, you can leave it at room temperature.
- Store the cake in an airtight cake container or cake dome to keep it fresh.
- Avoid storing it in direct sunlight or a warm kitchen, as the caramel and frosting may soften too much.
2. Refrigerating the Cake (Best for longer storage)
- If you need to store the cake for up to a week, refrigeration is the best option.
- Place the cake in an airtight container or cover it loosely with plastic wrap.
- Before serving, let the cake sit at room temperature for 30 minutes to soften for the best texture.
3. Freezing for Long-Term Storage (Perfect for making in advance)
If you want to freeze the entire cake or individual slices, follow these steps:
- For a Whole Cake: Wrap the fully assembled cake tightly in plastic wrap, followed by aluminum foil. Freeze for up to 2-3 months.
- For Slices: Wrap each slice in plastic wrap and place them in a freezer-safe bag or container.
- To Thaw: Transfer to the refrigerator overnight, then bring to room temperature before serving.
Final Tips for the Best Salted Caramel Chocolate Cake
✔️ For the best texture, slice the cake with a warm knife. Run the knife under hot water, wipe dry, and then cut for clean slices.
✔️ Want an extra caramel touch? Drizzle warm caramel over individual slices before serving.
✔️ To enhance the flavor, let the cake rest overnight. The flavors intensify, making it even more delicious the next day!
✔️ Pair with coffee or vanilla ice cream. The bitterness of coffee or the creaminess of ice cream complements the cake beautifully.
Final Thoughts
This Salted Caramel Chocolate Cake is a dessert lover’s dream—rich, indulgent, and perfectly balanced between chocolate and caramel flavors. Whether you make it for a birthday, a special gathering, or simply to treat yourself, it’s guaranteed to impress!
Now that you have the full recipe, are you excited to try it? Let me know if you need any modifications or additional tips! Happy baking!